In a real life scenario, automation framework is designed as a structural and conceptual module that provides high extensibility, maintainability, libraries, and guidelines for future development. The following are basic steps to help start designing and implementing automation framework using Selenium Webdriver, J-unit, and Java in Eclipse IDE. If you missed part one of this tutorial, don't worry, just click here.
Project Setup
Once you choose a framework, set up your project in the given IDE.
-Download any latest version of Eclipse, but make sure you choose the correct type (e.g. Eclipse IDE for Java developers).- -Create Java/Maven, or any relative project in Eclipse, or any IDE. When you create the Maven project, give meaningful names to the ArtifactID and GroupID.
- -Download Selenium Webdriver as the selected language from http://www.seleniumhq.org/download/.
- -Add the Selenium jar to the Eclipse IDE project by right clicking on Project, and then selecting Build path -> Configure build path -> Libraries -> Add external jars.
- -If you would like to run tests using Firefox, then download the most recent version of Geckodriver from https://github.com/mozilla/geckodriver/releases.
- -If you're choosing to use Chrome as a testing browser, then download Chromedriver from https://sites.google.com/a/chromium.org/chromedriver/downloads and save either driver in a specific directory.
- -Once everything is setup, you're ready to write the first automation (functional) test.
Writing the first automation code: When you write automation tests for web applications, all tests are mostly click events. All user interactions with the system happen by clicking, selecting, dragging, and dropping events.
Code sample for Chrome browser: This sample test will open Google Chrome browser. Go to google.com and click on the Gmail link. Check if the Gmail login page is displayed by checking page title. After it has been validated, the browser will close.
import org.junit.Test;
import org.openqa.selenium.By;
import org.openqa.selenium.WebDriver;
import org.openqa.selenium.chrome.ChromeDriver;

public class SeleniumTest {

   @Test
   public void display()
   {

          System.setProperty("webdriver.chrome.driver",
          Path to the chrome driver");
          WebDriver driver = new ChromeDriver();
          driver.get("http://google.com");
          driver.findElement(By.linkText("Gmail")).click();

          String title = driver.getTitle();
          Assert.assertEquals("Gmail - Free Storage and Email from Google", title);
          driver.quit();
          }

}
Code sample for the Firefox browser: This sample test will open in the Firefox browser. Go to google.com, and click on the Gmail link. Check if the Gmail login page is displayed by checking the page title. After it has been validated, the browser will close.
import org.junit.Test;
import org.openqa.selenium.By;
import org.openqa.selenium.WebDriver;
import org.openqa.selenium.firefox.FirefoxDriver;

public class SeleniumTest {

          @Test
          public void openFireFox()
          {

              System.setProperty("webdriver.gecko.driver",
                      "**/geckodriver");
              WebDriver driver  = new FirefoxDriver();
              driver.get("http://google.com");
              driver.findElement(By.linkText("Gmail")).click();
              String title = driver.getTitle();
              Assert.assertEquals("Gmail - Free Storage and Email from Google", title);
              driver.quit();

           }

     }
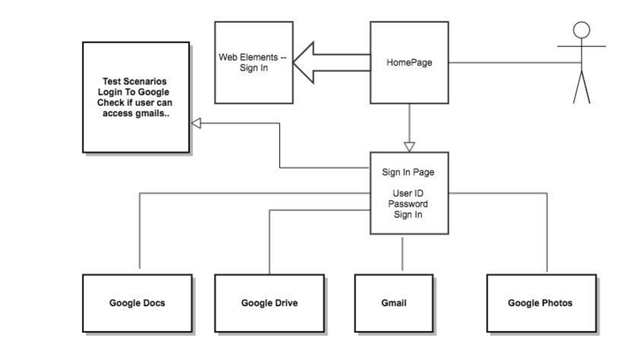
Now, let’s try a sample example for defining a page object model. In a page object model, every web page is seen as a WebObject, and every web element on that page can be considered a data element or member of WebObject. Each user action can be simulated as a web element action like click/submit/select or send text.
In web application, almost every home page has a login link. Consider when a user clicks on a login link/button, the user returns to the login page. Now, declare the login page as one WebObject and the home page as another WebObject in your automation code. It should look like this:
Public class LoginPage {

      Private static string USER_ID =”xpath for user id”;
      Private static string PASSWORD = “xpath for password”;
      Private static String SIGN_IN =”xpath for signIn”;
      WebDriver driver;

      Public LoginPage(WebDriver d ) {
      This.driver =d;
      }

      Public HomePage Login(string userId, String passWord) {
        Driver.FindElement(USER_ID).sendLeys(userId);
        Driver.FindElement(PASSWORD).sendKeys(passWord);
        Driver.FindElement(SIGN_IN). click()

        Return new HomePage(driver);

     }

}
public class HomePage {
private WebDriver driver;
// declare some functions and data members here available on the homepage.

public HomePage( WebDriver driver) {

this.driver = driver;
}

}
You can use Firepath/Firebug plugins to find the exact XPath or different locators for each web element.
In the test class, you can just invoke the LoginPage object and call the Login method to Login so you don’t have to repeat the code for the Login method in the Test class. Here's an example:
Public class LoginTest {
Public LoginPage = new LoginPage(driver);
HomePage homepage = LoginPage.Login(userId, password);
// Here you can call any method for HomePage web object.
}
When developing code, make sure that the page object:
- -Provides a public method to act as a utility call or some kind of service call to or from other WebObjects
- -Encapsulates details of individual elements on the page inside page object
- -Provides all the web elements required for the testing even though it may not contain all web elements on the page
- -Returns different page objects depending on the public method
- -Does not contain any kind of assertions.
Refactoring the Code for the Page

This can be implemented using a page object pattern by making the home page a utility class that will implement functionality and web elements on the home page. The sign in page can be used as one object for the login user, and then all other apps can be created as separate WebObjects that can be aggregated from the sign in page.
All the web elements that are common to each page can be moved to some common class and declared as constants. Create a new package such as src/test/resources to add property files where you configure the details of a user ID, password, web app URL, and data files path.
Create a separate test class where you can call required WebObjects shown in the examples above, and validate the test by using different assertions in your test. You can also minimize implementation by trying to avoid duplicating the same functionality. We can refactor the code above into the code below, to obtain inheritance in our test cases as well as improve readability and usability.
Let’s say the login page is declared as a parent class, which will setup the driver/browser, and provide login functionality. Once tests are completed, it will close the browser. We can extend the LoginTest class, which will inherit properties from the Base Class and add new properties of its own, which can validate all login test scenarios.
public class HomePage  {


      Public HomePage(WebDriver d ) {
      This.driver =d;
      }

      public LoginPage ClickOnSingIn() {
      d.findElement(By.id(“Sign In”)).click();
      }

}

Public class LoginPage  extends HomePage{

      Private static string USER_ID =”xpath for user id”;
      Private static string PASSWORD = “xpath for password”;
      Private static String SIGN_IN =”xpath for signIn”;
      WebDriver driver;
      Public LoginPage(WebDriver d ) {
      super(d);
      }

      Public HomePage Login(string userId, String passWord) {
      Driver.FindElement(USER_ID).sendKeys(userId);
      Driver.FindElement(PASSWORD).sendLeys(passWord);
      Driver.FindElement(SIGN_IN). click()

      Return new HomePage(driver);
        // declare some links
      }

}

public class Base {

 private Webdriver d;

       @BeforeClass
       public void setup() {
            String file =      System.getProperty("user.dir")+"/src/test/resource/environment.properties";
File fis = new File(file);
FileInputStream fileInput = null;
try {
fileInput = new FileInputStream(fis);
} catch (FileNotFoundException e) {
e.printStackTrace();
}
properties = new Properties();
try {
properties.load(fileInput);
} catch (IOException e) {
e.printStackTrace();
}

System.setProperty("webdriver.gecko.driver", "**/geckodriver");
this.driver = new FirefoxDriver();
this.driver.manage().timeouts().implicitlyWait(10, TimeUnit.SECONDS);

    }

public void getWebUrl() {
      driver.get( properties.getProperty("url"));

}

@AfterClass
public void closeBrowser() {
   driver.quit();

}

}

Public class LoginTest extend Base {
  private WebDriver driver;

@Test
public void loginTest () {
   setUp();
   getWebUrl();
   // Here you can call any method for HomePage/Login Page web objects.
   HomePage homePage = new HomePage(driver);
   LoginPage loginPage = homePage.ClickOnSingIn();
   homePage = loginPage.Login(userId, password);
   Assert.assertTrue(true);
       }
}
Configuring the data in your automation code:
- You can use the properties file to use data in your test cases. For example in your test, you can call:
Properties prop = new Properties();
FileInputStream inputDataFile = new FileInputStream(“file path”);
Try {
Prop.load(inputDataFile);
} catch (IOException e)  {
system.println(e.getMessage());
}
String userID = driver.get (prop.getProperty(USER_ID));
This is implemented in the base test class, but when you need multiple values for the same properties in your test runs, then defining properties in the property file is actually not good idea. In that case, either using CSV or Excel files is a better option.
In order to use input data in XLS format, follow the steps below:
-Download the POI API from Apache using: http://poi.apache.org/download.html
-Unzip or extract all the files from the zip or .tar.gz file and add all the jar files to the project path (right click on project-> build Path ->configure build path->libraries->add external Jars)
-Once all jar files are added to the project path, test your input data file with the sample code below:
try {
   //Get input data file
   File inputDatafile=new File("/Users/meerahonde/Documents/TestData.xlsx");

    // load the file in input stream format
    FileInputStream fis=new FileInputStream(inputDatafile);

   // Load workbook
   XSSFWorkbook workBook=new XSSFWorkbook(fis);

  // Load first sheet
  XSSFSheet sheet1= workBook.getSheetAt(0);

 //Print data from first and 2nd column of 2nd row (as first row is generally property name
 System.out.println(sheet1.getRow(1).getCell(0).getStringCellValue());

 System.out.println(sheet1.getRow(1).getCell(1).getStringCellValue());

 } catch (Exception e) {

    System.out.println(e.getMessage());

 }
 }
 }
Integrating your code in continuous integration server:
- Once your tests are running locally:
- -Install Jenkins, which you can download https://jenkins.io/, and run the .war file using command line on your local machine
- -Setup JDK in Jenkins by using the configure tab
- -Create a new job in Jenkins
- -Configure all your tests in the new job
- -Run the job and test on continuous integration
-
Conclusion
-
And that's it! I hope you've found this article helpful. I'd love to hear how this tutorial worked for you, let me know your thoughts and experiences.
Author
Meera Honde
Meera Honde is a Lead Automation Engineer at Avenue Code. Meera loves to solve problems. Her hobbies include traveling, driving, cooking, and watching movies.


