
One of the biggest challenges in system development is choosing an Architecture for the system. There is not any predefined architecture that can be applied directly to your projects. In this article I would like to discuss a simple Mule deployment architecture.Avenue Code is the preferred systems integrator for MuleSoft Anypoint Platform due to our expertise with complex, large-scale e-commerce systems. Check out our guide on simple deployment architecture, and feel free to talk with us about our solutions for your organization.

The Problem
First, let's discuss a common problem. Over the course of time, projects/modules often increase in size due to the importation of lots of external libraries. Let's assume the size has increased to a few gigabytes. By this point, the time it takes to generate the deployable archive, copy, and deploy it in Mule Runtime would be enormous. So in this article, I will outline a solution to this challenge.
Before Starting
Let's discuss how classloaders work in Mule Runtime to set the stage. As you may already know, Mule has a hierarchy of classloaders. Have a look at the diagram below:
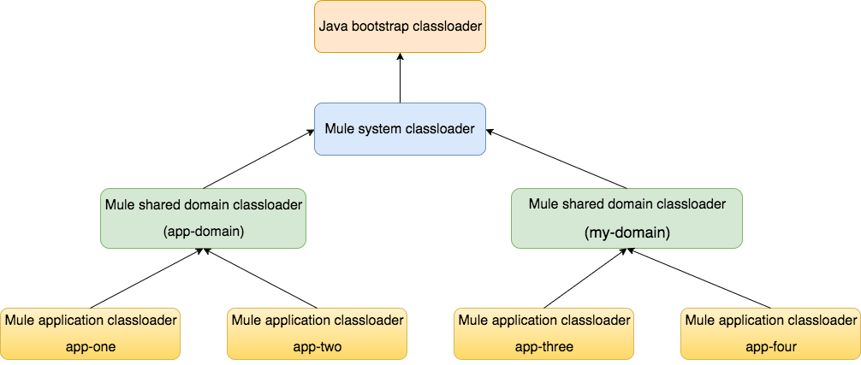
At Mule startup, the Java bootstrap classloader will load the necessary classes of the JDK. Then the Mule system classloader will load the classes present in lib/mule and lib/opt directories. Subsequently, the Mule shared domain classloader will load the classes present in each of the domains being used in the applications, which will search classes in the lib/shared/<domain-name> directory. Finally, the Mule application classloader will load classes bundled within the application.
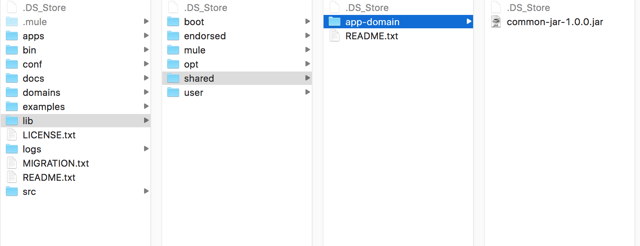
Here is the screenshot of the directories as they appear in Mule Runtime:
The Magic Trick
As our diagram shows, the Mule shared domain classloader loads the classes present in domains used in the applications. Furthermore, it looks for the classes in the directory lib/shared/<domain-name>. This is the key!
For example, our application depends on 100 external libraries (jar).Now each time you want to deploy the application in Mule Runtime you make a zip file along with 100 external jars. The size of the archive will, of course, be huge, and consequently so will the up time.
The solution to overcome this problem is to:
-
Create a domain project and use this domain in the application/s. Let's name the domain as app-domain.
-
In the Mule Runtime, create a folder under lib/shared directory with the name of the domain created in step 1. E.g., lib/shared/app-domain.
-
Copy all the jars necessary for the application/s to the directory created in step 2.
-
In the application/s, while generating the deployable zip file using maven, DO NOT bundle the libraries with the application. In other words, use provided scope in the dependencies in the pom.xml.
So, now each time you create the deployable archive (zip), the archive will be much smaller and easier to deploy. In addition, all the libraries that are copied to the lib/shared/app-domain directory will be available to all the applications using the domain app-domain.
System Requirements
The following items are required for the tutorial:
-
Mule Community Runtime 3.8.1
-
Mule Server 3.8.1 CE plugin installed in Anypoint Studio.
The Implementation
The complete source code can be found in the repository.
The Parent pom project
I have a parent pom project where I am declaring all the dependencies necessary for the projects related to a domain (app-domain). Let's suppose that our applications in the domain (app-domain) will depend on only one jar (common-jar.jar). Here is the complete pom.xml:

Note that the scope of the dependency is provided. This means that the dependency will not be bundled with the final archive.
NOTE: I have copied the common-jar to lib/shared/app-domain.
The Domain Project
Now I have created a domain project named app-domain. Here is the pom.xml

The only thing we are doing here is declaring the parent pom.
Projects Using The Domain Project
I have created two projects: app-one and app-two. In both projects, I've declared the parent project, such that the dependencies declared in the parent project (common-jar) will be automatically imported to app-one and app-two.
1. app-one
In the app-one project I have declared a specific dependency (demo-jar). Here is the pom.xml:

You can see that I have put the dependency scope as compile - this means that the jar willl be bundled with the app-one deployable archive.
app-two
This one is a simple project without any extra dependencies. It's just using the common dependency inherited from its parent. Here is the pom.xml.

Deployment
Create the deployables for each of the projects (app-domain, app-one and app-two) using mvn install command. Deploy the domain in the domains directory of the Mule Runtime. Please note that it should have the exact same name as app-domain. Remove the version information if there is any. Copy the app-one and app-two zips to the apps directory - and that's it! If Mule Runtime is running it will deploy the applications properly. To check the applications, just hit the urls http://localhost:8081/app1 and http://localhost:8081/app2.
Get in touch about how Avenue Code can guide you as the preferred systems integrator for MuleSoft Anypoint Platform!


