
A common problem with the traditional blocking API style is what we call backpressure. Simply put, backpressure is when clients or consumers overwhelm the server's capacity to process requests. This creates the need for efficient hardware and software scaling. Fortunately, Spring WebFlux offers a solution.
We always want to improve our servers' capacity to process requests, preferably without additional hardware costs. Programming reactively and asynchronously allows us to improve our API's ability to scale vertically with no need for additional nodes in the cluster.
As of September 2017, Spring 5.0 went GA, and one of its most exciting new features is its support for building reactive APIs through the new spring-webflux module. Spring WebFlux provides us with the resources to build a reactive API in a declarative rather than imperative manner. Its two main programming models can be classified into annotated controllers - based on the same annotations from the spring-web module - and functional endpoints, which use lambda expressions and functional style.
Today we'll walk through the steps of building a simple microservice to illustrate the main features of the spring-webflux module using functional endpoints, followed by integration tests to validate the Restful API.
Before Starting
Make sure you have Java version 1.8 or later. We are going to use MongoDB as our database because Spring provides an out-of-the-box, reactive MongoDB repository implementation for us to use. You can get MongoDB using brew with a simple command:
$ brew install mongodb
To start up the server, simply type:
$ mongod
Setting Up Our Project
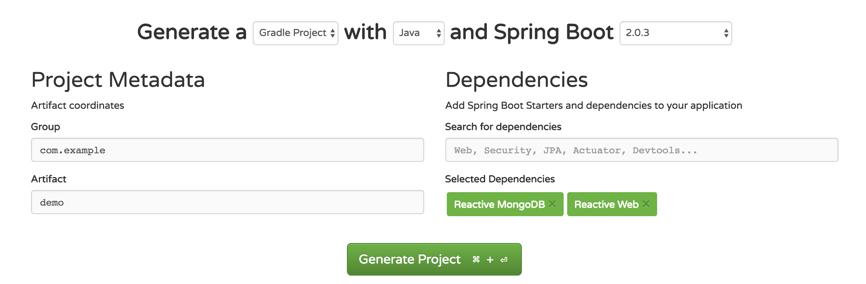
- To set up our project, go here, select Gradle Project, add Reactive Web and Reactive MongoDB to the dependency list, download the compressed file by clicking on "Generate Project," then extract into your workspace and open the project using your favorite IDE.
Database
Next, let's set up our database connection. Fortunately, doing so is as simple as adding the following line to your application.properties file.
Now we need to create a POJO to represent the entity we want to save. We are going to use a simple Book.java class as our model.
Our DB repository is implemented the same way a traditional JPA repository is. We just need to create an interface that extends the Spring repository implementation. For our purposes, we will be using the ReactiveMongoRepository interface, which already contains all the features we need to make our API fully reactive.
Controller
Now let's start developing our REST controller. Our controller contains 5 endpoints. We will walk through each one of these to illustrate how reactive concepts are implemented.
POST /books
This endpoint adds an entry to our MongoDB database. Notice that we are returning a Mono object that wraps the entity that was created. If you look into the Mono class definition, you will see that it extends a class called Publisher: a Publisher is a reactive stream that may send data to one or more subscribers. The subscribers may use the information as it becomes available--that is, they react as the publisher provides information.
GET /books
This endpoint is responsible for returning a Publisher that hands over all the book instances we have created in our DB. The main difference between this endpoint and the previous one regarding reactivity is the Publisher implementation we return. We have used a Mono to return the single instance we have just saved, and now we are using a Flux to get all the instances we have created until this moment. That's the main difference between a Flux and a Mono: a Mono can omit 0 to 1 instances of the parameterized item, while a Flux can omit 0 to n instances.
GET books/{isbn}
We now query our books collection to return a single item specified by its primary key: the ISBN. Notice that, in this endpoint, we are wrapping a ResponseEntity object into a Mono object. We are using a Mono publisher because we want to return a single instance, and we are using the ResponseEntity object to enable us to return HTTP status 404 in case the book doesn't exist in our application domain. This endpoint is also useful to show how WebFlux is compatible with a traditional HTTP implementation.
GET /booksWithDelay
For this endpoint we do something slightly different from the GET /books endpoint: we add a delay time between each item to simulate processing time. This is done through the method call delayElements(Duration.ofMillis(1000)). The publisher will wait for 1 second before addressing each item in the stream. Notice that the media type we produce is also different. We are producing an application/stream+json media instead of a simple JSON. That is useful for telling our client that we are returning a stream instead of a regular response entity.
Testing
The traditional web client implementation for consuming REST APIs in Spring is the RestTemplate class. With the new reactive framework, we also get a reactive REST client implementation: the WebClient class. For writing our integration tests, we are going to auto-inject the implementation of WebClient for testing purposes, which is WebTestClient. Its fluent interface allows us to do method chaining and assert the results in a more declarative way. Observe that all the pre- and post-test operations in the DB are using the block() method to avoid synchronization problems.
Let's explore the /booksWithDelay endpoint with curl. First, we need to build our API. From inside the project directory, execute:
$ gradle build
When the previous command is finished, start up the web server with:
$ gradle bootRun
Check in the console to see when the application is done starting. After it's done, we can start sending requests to our endpoints. Let's create two books in the DB:$ curl -X POST http://localhost:8080/books -H 'content-type: application/json' -d '{ "isbn" : "978-0451518651", "title" : "1984", "publicationDate" : "1949-06-08"}'$ curl -X POST http://localhost:8080/books -H 'content-type: application/json' -d '{"isbn" : " 0-330-25864-8", "title" : "The Hitchhiker'\''s Guide to the Galaxy", "publicationDate" : "1979-10-12"}'
Now, let's retrieve them by using the GET /booksWithDelay:
$ curl -X GET http://localhost:8080/booksWithDelay
{"isbn":"978-0451518651","title":"1984","publicationDate":"1949-06-08"}
{"isbn":" 0-330-25864-8","title":"The Hitchhiker's Guide to the Galaxy","publicationDate":"1979-10-12"}
You should notice that the books are being provided with a 1s delay between each other. That's because we added that delay on purpose to illustrate the reactive concept. We could use subscribers to this publisher to process information as it becomes available rather than having to wait for all items to become available.
Final Considerations
Now that we've learned a little more about reactive programming with Spring, it's important to make a couple closing remarks. If you try to debug a functional reactive API, you are going to find out that debugging is much harder when you use functional style. That's something to account for, depending on how complex your application is. Also, keep in mind that if you already use Spring MVC, there's no need to completely switch to WebFlux. Both styles work together without any problems, so you can build reactive controllers that coexist with your MVC controllers. I hope you have enjoyed learning something new!
References:
WebFlux Framework, Part 5. The Web


