New Relic is a performance monitoring tool well known by the microservices community. It supports a lot of platforms, but it's support for .NET Core is still recent. In this post, I'll walk you through how to configure a .NET Core 2 Web API to send metrics to New Relic from a Docker container inside an Azure Web App for Containers.
To follow this tutorial, you'll need a New Relic account and a valid New Relic license key. You will also need Docker and .NET Core 2 configured and running in you development machine, a Docker Hub account, and an Azure subscription.
Creating the Web API
Let's start by creating a new Web API. In this demo, I will name our API baseline-demo.
In the baseline-demo project folder, type:
dotnet new api
This command will scaffold our API.
Now, let's add Swagger to this API to give us a UI to test it:
dotnet add package Swashbuckle.AspNetCore
dotnet add package Swashbuckle.AspNetCore.SwaggerUI
Next, change your Startup.cs file to set up the Swashbuckle middleware:
public class Startup
{
    public Startup(IConfiguration configuration)
    {
        Configuration = configuration;
    }

    public IConfiguration Configuration { get; }

    public void ConfigureServices(IServiceCollection services)
    {
        services.AddMvc();
        services.AddSwaggerGen(c =>
        {
            c.SwaggerDoc("v1", new Info { Title = "My API", Version = "v1" });
        });
    }

    public void Configure(IApplicationBuilder app, IHostingEnvironment env)
    {
        if (env.IsDevelopment())
        {
            app.UseDeveloperExceptionPage();
        }

        app.UseMvc();
        app.UseSwagger();
        app.UseSwaggerUI(c =>
        {
            c.SwaggerEndpoint("/swagger/v1/swagger.json", "My API V1");
        });
    }
}
Run the API and test it using the Swagger UI:
dotnet run
http://localhost:5000/swagger
Adding Docker and New Relic
Now let's look at how to add Docker and New Relic. First, download the New Relic .NET Core agent. In this demo, we'll use the Debian version.
http://download.newrelic.com/dot_net_agent/core_20/current
Copy the file newrelic-netcore20-agent*.deb to the folder baseline-demo/newrelic.
In the folder baseline-demo, create a DOCKERFILE with the following content:
FROM microsoft/dotnet:2.0.0-sdk-2.0.2-stretch

ENV CORECLR_ENABLE_PROFILING="1" \
CORECLR_PROFILER="{36032161-FFC0-4B61-B559-F6C5D41BAE5A}" \
CORECLR_NEWRELIC_HOME="/usr/local/newrelic-netcore20-agent" \
CORECLR_PROFILER_PATH="/usr/local/newrelic-netcore20-agent/libNewRelicProfiler.so" \
NEW_RELIC_LICENSE_KEY="YOUR_LICENSE_KEY" \
NEW_RELIC_APP_NAME="baseline-demo"

WORKDIR /app

ARG runtimeIdentifier=debian-x64
ARG files=./bin/Release/netcoreapp2.0/$runtimeIdentifier/publish
COPY $files ./appcode

ARG NewRelic=./newrelic
COPY $NewRelic ./newrelic

RUN dpkg -i ./newrelic/newrelic-netcore20-agent*.deb

ENV ASPNETCORE_URLS http://+:5000
EXPOSE 5000

WORKDIR /app/appcode
ENTRYPOINT ["dotnet", "./baseline-demo.dll"]
Now, publish your API targeting debian-x64:
dotnet publish -c Release -r debian-x64
And build a docker image with the published content:
docker build . -t baseline-demo
Now, simply run your container:
docker run -itp 5000:5000 -rm baseline-demo
Go to Swagger and make some GET requests.
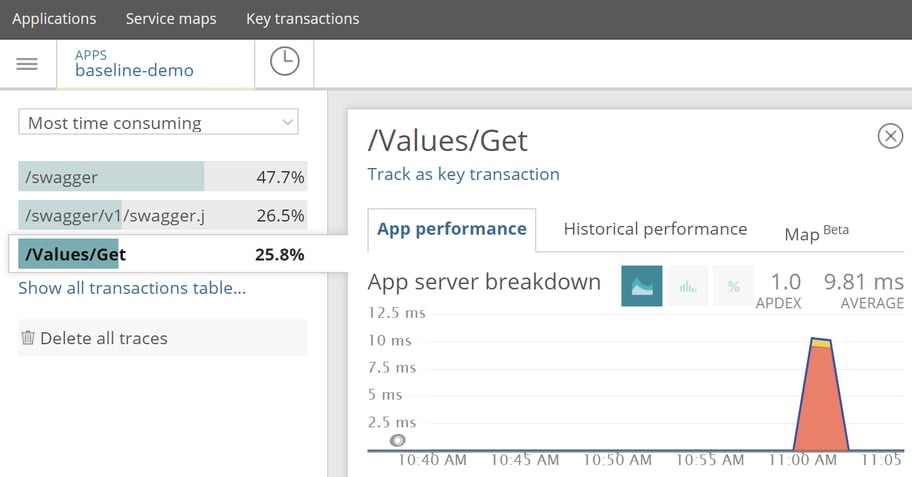
In a few minutes, you should see some metrics under your account in New Relic. They will appear as follows:

Publishing the Container to Docker Hub
On your Docker Hub portal, create a new repository and give it the same name as your Docker image.
Then, tag the local image to match this Docker Hub repository, like this:
docker tag baseline-demo rafaelromao/baseline-demo
Log in to your Docker Hub account and push the local image to the repository:
docker login
docker push rafaelromao/baseline-demo:latest
Now your image will be available for use in an Azure Web App for Containers.
Running Your Web API Container on Azure
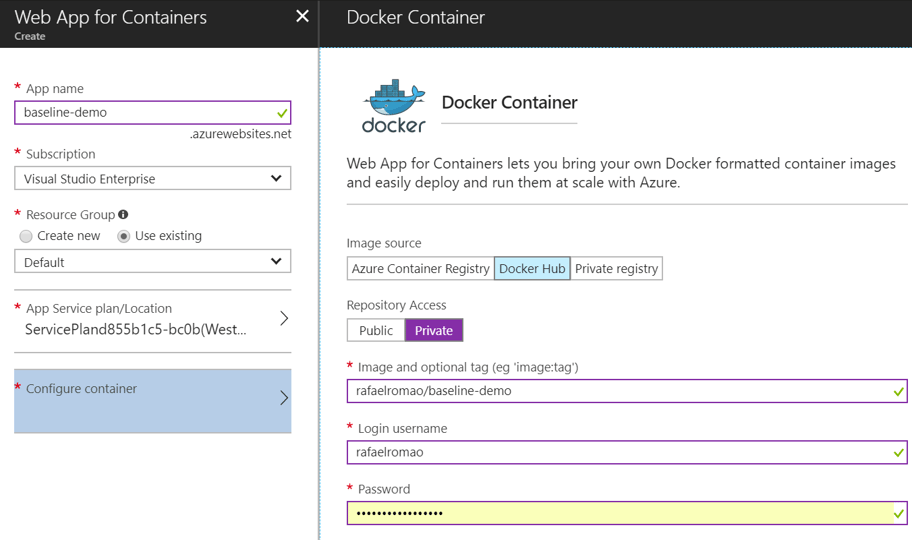
In the Azure Portal, click New and search for "Web App for Containers." Follow the creation wizard and inform your container settings when requested:
Finish the creation and access the /swagger endpoint in the URL provided for your app and make some test requests.
https://baseline-demo.azurewebsites.net/swagger
Now go to New Relic again to see the metrics collected from your API, which is now running on Azure.
Conclusion
This short tutorial shows one of the many options available for configuring New Relic for a .NET Core 2 Web API. For more information, check out New Relic's documentation. Don't forget to comment below to tell us what you think about the amazing tools we used in this demo!
Author
Rafael Romão
Rafael Romão is a Software Engineer at Avenue Code. He has studied software development since 1998 and has worked as a software developer since 2002. His main areas of interest are software architecture and design, as well as the development of highly productive teams.


