
This article will delve into the details of the Mulesoft JWT Validation policy. It is intended for advanced users with a comprehensive understanding of the platform's internal operations. The goal is to provide a concise overview of the policy's inner workings.
Introduction
To ensure a comprehensive understanding of the Mulesoft JWT Validation policy, this in-depth article will start from the basics. Advanced users can skip over sections that cover topics they already understand well. The article will be divided into the following sections:
- JWT Configuration in Keycloak
- Validating JWT with Java
- Configuring JWT in Mulesoft
- Checking the source code of the Mulesoft JWT policy
- Conclusion
1. JWT Configuration in Keycloak
Since there is already an abundance of information available online regarding JWT, I won't be delving into its technical details. Instead, for this demonstration, I will be using the Keycloak Identity Server to generate JWTs. I have found it to be both free and straightforward to use.
Keycloak installation
If you have Docker installed on your machine, it is the best way to try it out.
docker run -p 8080:8080 -e KEYCLOAK_ADMIN=admin -e KEYCLOAK_ADMIN_PASSWORD=admin quay.io/keycloak/keycloak:20.0.3 start-dev
After setting up your Keycloak server, you can navigate to http://localhost:8080. Here, you will be greeted by a user-friendly welcome screen, similar to the one shown below..png?width=512&height=388&name=Blog%20image%20april%2012%20(Keycloak).png)
Configure a Client
To get started, we need to configure a client. On the left-hand side of the screen, select the "Clients" option and then click on "Create Client".
.png?width=512&height=476&name=Blog%20image%20april%2012%20(Keycloak%20Clients).png)
Add the client name as shown in the screenshot below:
.png?width=512&height=345&name=image%20(19).png)
Add the capabilities to the client:
.png?width=512&height=356&name=Blog%20image%20april%2012%20(Capability).png)
Save and check the Credentials section of the Mule client to find the Client Secret, as shown below:
.png?width=512&height=345&name=Blog%20image%20april%2012%20(Credentials).png)
Finding the Well-Known URL of Keycloak
To find the well-known URL of Keycloak, follow these steps:
- Click on "Configure" → "Realm settings" → "General".
.png?width=512&height=472&name=image%20(22).png)
If you go to the OpenID Endpoint Configuration link, you will find the well-known endpoints that are exposed by the Keycloak server. This is a useful feature.
In my case, the endpoint is:
http://localhost:8080/realms/master/.well-known/openid-configuration
To use it, simply invoke the endpoint using Postman or any other platform of your choice, and you'll be ready to go.
.png?width=512&height=424&name=Blog%20image%20april%2012%20(Endpoint).png)
Generate JWT
To generate a JWT, invoke the token endpoint:
- curl --location '<http://localhost:8080/realms/master/protocol/openid-connect/token>' \\
--header 'Content-Type: application/x-www-form-urlencoded' \\
--data-urlencode 'client_id=mule' \\
--data-urlencode 'grant_type=client_credentials' \\
--data-urlencode 'client_secret=SIGlvYOaD8cJ3DggiW2UBw9E3zpkpWrS' \\
--data-urlencode 'scope=openid'
Check my Postman screen-shot:
.png?width=800&height=549&name=Blog%20image%20april%2012%20(Postman).png)
The id_token contains the information we are interested in. We can decode it to verify its contents.
.png?width=800&height=620&name=Blog%20image%20april%2012%20(id_token).png) In the next section, we will validate the token using Java code.
In the next section, we will validate the token using Java code.
2. Validating JWT with Java
We will use simple code to validate a JWT token against the JWKS URL. It's important to note that we can easily locate the JWKS URL using the well-known URL. In this case, the JWKS URL is:
http://localhost:8080/realms/master/protocol/openid-connect/certs
The functionality of the JWKS URL is straightforward - it exposes a set of keys (kid) that can be used to validate JWTs. While there is a lot of information available online about this topic, we won't go into further detail here.
To write the Java code, we will use the Nimbus JOSE+JWT libraries. The following code snippet demonstrates how to use these libraries:
When the token is valid you get the below output:
import com.nimbusds.jose.JWSAlgorithm;
import com.nimbusds.jose.jwk.source.JWKSource;
import com.nimbusds.jose.jwk.source.RemoteJWKSet;
import com.nimbusds.jose.proc.JWSKeySelector;
import com.nimbusds.jose.proc.JWSVerificationKeySelector;
import com.nimbusds.jose.proc.SecurityContext;
import com.nimbusds.jwt.JWTClaimsSet;
import com.nimbusds.jwt.proc.ConfigurableJWTProcessor;
import com.nimbusds.jwt.proc.DefaultJWTProcessor;
import java.net.URL;
public class App {
public static void main(String[] args) {
validate("eyJhbGciOiJSUzI1NiIsInR5cCIgOiAiSldUIiwia2lkIiA6ICJIYkVIUE5COWRLOWlpNG16YUhzejJTYUZzTFo5ZkloYTdwcmpPdW5YUE5NIn0.eyJleHAiOjE2NzY4MTQ4NTYsImlhdCI6MTY3NjgxNDc5NiwiYXV0aF90aW1lIjowLCJqdGkiOiIyOGYxODUzYy00MGRiLTQ2ZGItYjc2My00ZTlhMTkyZDYzODAiLCJpc3MiOiJodHRwOi8vbG9jYWxob3N0OjgwODAvcmVhbG1zL21hc3RlciIsImF1ZCI6Im11bGUiLCJzdWIiOiIyYmRiMjUzMy04Y2ZlLTQ3ZWEtOWY0Zi1lOGJlMDEyYzdhM2EiLCJ0eXAiOiJJRCIsImF6cCI6Im11bGUiLCJhdF9oYXNoIjoiM3FGU0otNXI0R2NOT0ZoeWxpZnlIZyIsImFjciI6IjEiLCJjbGllbnRIb3N0IjoiMTcyLjE3LjAuMSIsImNsaWVudElkIjoibXVsZSIsImVtYWlsX3ZlcmlmaWVkIjpmYWxzZSwicHJlZmVycmVkX3VzZXJuYW1lIjoic2VydmljZS1hY2NvdW50LW11bGUiLCJjbGllbnRBZGRyZXNzIjoiMTcyLjE3LjAuMSJ9.E4nINN9ebHnYxfJovL_Qwd9uB6AyGE6-jwSWiENfxzAOy0iZJriT0bsENjgf3XuoA0amfEwN6DKBr8eQeVxdkpOhq_rZpo4GgDYz11cOvYX-3-qVbr2-LCssSxmqcvvNq1lWj6VqkbcVGHZzrvjHdST05lNAJG1Jfnd59u9Tjoxmy7RJktVfasaSPLZm_qdmffAAPXKwLA-XD9HOZsUV-MHgOq2yg7q-sdzIokWtfCnKdjGjZ3XVMmTNAa_H1Vqh8Nab3Nsi1kxuAHi10Xac70NUgATcSEICfclwMmS02SkRo5PZbDRinKQMWWNmoWRCaS97qpT_NKb6Urez0ea1uw");
}
public static void validate(String accessToken) {
try {
ConfigurableJWTProcessor<SecurityContext> jwtProcessor = new DefaultJWTProcessor<>();
JWKSource<SecurityContext> keySource = new RemoteJWKSet<>(new URL("http://localhost:8080/realms/master/protocol/openid-connect/certs"));
JWSKeySelector<SecurityContext> keySelector = new JWSVerificationKeySelector<>(JWSAlgorithm.RS256, keySource);
jwtProcessor.setJWSKeySelector(keySelector);
JWTClaimsSet claimsSet = jwtProcessor.process(accessToken, null);
System.out.println(claimsSet.toJSONObject());
}
catch (Exception e){
e.printStackTrace();
}
}
}
When the token is valid you get the below output:
|
{at_hash=3qFSJ-5r4GcNOFhylifyHg, sub=2bdb2533-8cfe-47ea-9f4f-e8be012c7a3a, clientHost=172.17.0.1, clientId=mule, email_verified=false, iss=http://localhost:8080/realms/master, typ=ID, |
When the JWT expires you get the below error:
.png?width=800&height=581&name=Blog%20image%20april%2012%20(JSON%20Web%20Token).png) Isn't it amazing? This is precisely the magic that Mulesoft employs in its JWT Policy, albeit in a more sophisticated manner. Now you know the secret behind it all!
Isn't it amazing? This is precisely the magic that Mulesoft employs in its JWT Policy, albeit in a more sophisticated manner. Now you know the secret behind it all!
3. Configuring JWT in Mulesoft
To create an API, follow these steps:
- Create a RAML in the Design Center.
- Publish the RAML to the Exchange.
- Import the RAML in the API Manager.
- Create the API.
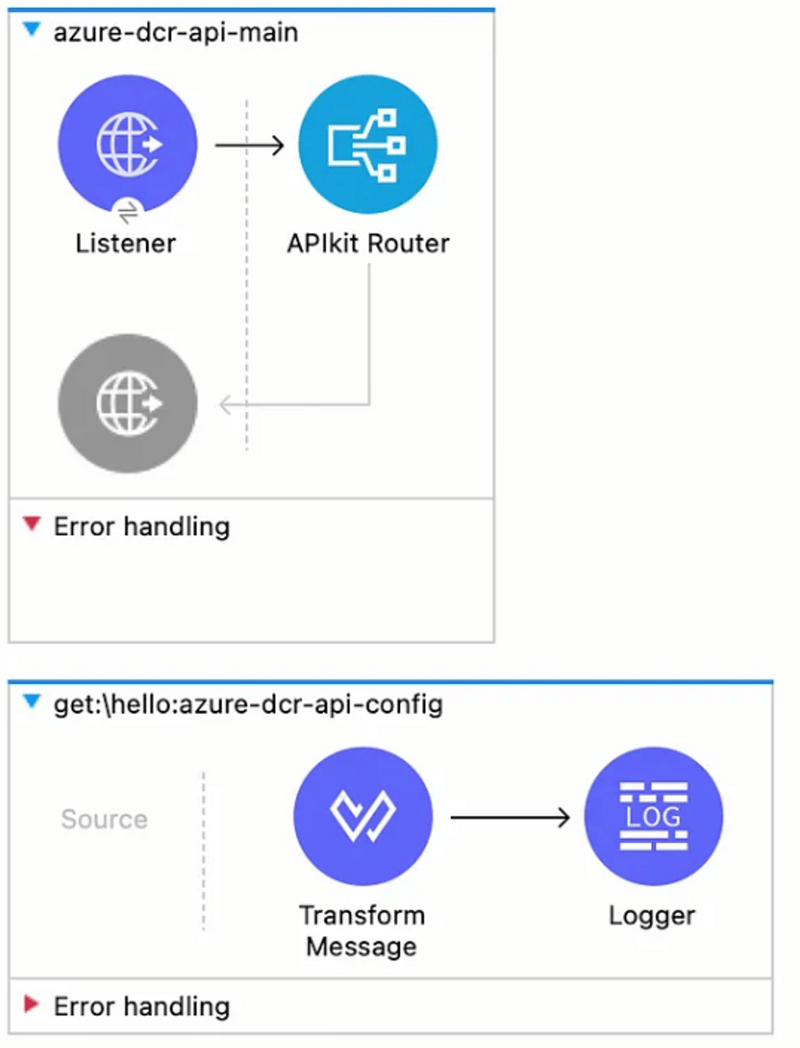
After creating the API, apply the JWT Validation policy to it.
.png?width=624&height=727&name=Blog%20image%20april%2012%20(JWT%20Validation).png)
4. Checking the source code of the Mulesoft JWT policy
The next section is particularly exciting because we will be debugging the Mulesoft JWT Policy. In my previous articles, I covered how to debug the entire Mulesoft Runtime, not just debugging a Mulesoft application (which is quite straightforward).
Here's what we'll be doing: first, we need to obtain the JWT Validation policy code. Follow the steps below to do so:
Configure Anypoint Platform credentials
The most effective way to obtain the JWT Validation policy code is to download a standalone Mulesoft Runtime 4.x onto your machine. After that, edit the wrapper.conf file to include the platform client_id and client_secret. In my case, I retrieved the environment's credentials to which I plan to deploy my API.
.png?width=800&height=486&name=Blog%20image%20april%2012%20(Anypoint%20Platform).png)
Additionally, configure debugging settings:
.png?width=800&height=522&name=Blog%20image%20april%2012%20(Anypoint%20Platform2).png)
I won't go into too much detail here, as you can find more information in the article I cited.
API Development
Assuming that you received the API Instance ID when you created the API in API Manager, you can create a mock implementation on your local machine using this information.
- Next, export the zip file and publish it to your standalone Mule Runtime (not Anypoint Studio). Place the file in the /apps folder.
- Run the standalone Mule Runtime and wait a few moments. Note that you will need to attach a debugger to the runtime. I typically use IntelliJ for this purpose.
Although we won't be debugging anything right now, I've set up everything for future use.
Over time, you'll notice that the JWT policy is automatically downloaded and installed in your standalone Mulesoft Runtime, which is located at:
.png?width=800&height=762&name=Blog%20image%20april%2012%20(Folder).png)
Explore the JWT Policy
To explore the contents of the jwt-validation-1.3.1-mule-policy.jar file, unzip it using a tool of your choice. Inside, you'll find several other JAR files, but you only need to focus on the one that is marked or highlighted.
This specific JAR file likely contains the core functionality of the JWT policy that you'll be using in your Mulesoft project. Take a closer look at its contents to gain a better understanding of how it works.
.png?width=800&height=732&name=Blog%20image%20april%2012%20(JAR%20file).png) If you're ready to test your API using the standalone MuleSoft Runtime, you can make a request to it and check the logs to troubleshoot any issues that arise.
If you're ready to test your API using the standalone MuleSoft Runtime, you can make a request to it and check the logs to troubleshoot any issues that arise.
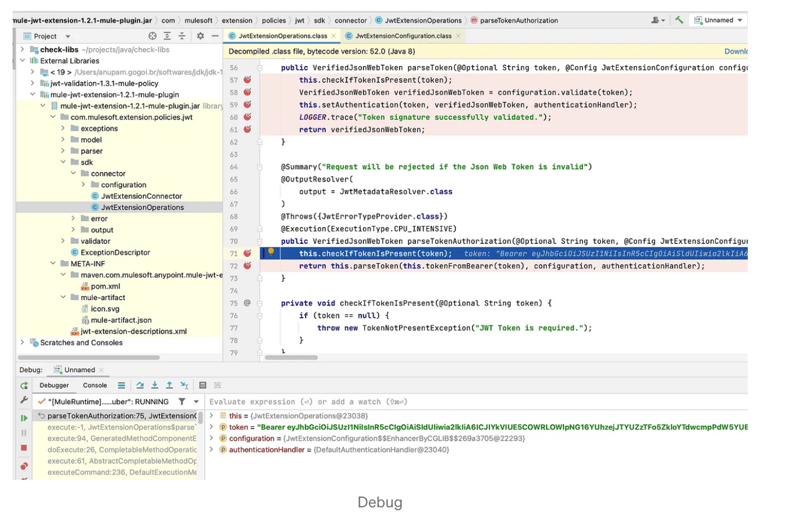 This is the method that is executed for JWT validation. If you take a closer look at the code, you will find that Mulesoft uses the Nimbus JOSE + JWT libraries to validate the JWT in a sophisticated manner. There are no secrets involved.
Conclusion
It's great to see that you've taken the time to explore what's happening under the hood in Mulesoft and the JWT validation process. By understanding how things work at a deeper level, developers can gain more confidence in their projects and make more informed decisions.
Using JWT doesn't have to be complicated! While there are intricacies to the validation process, tools such as Mulesoft and libraries like Nimbus JOSE + JWT can simplify it and make it more accessible for developers at all levels of experience.


