
Angular is currently one of the most used front-end frameworks. Even though it provides a lot of out-of-the-box features that enforce good practices, you still need to know these four design tips to keep your application clean, sustainable, and scalable.
The guidelines presented below will help you design high-performance applications where continued development is sustainable and scalable as the complexity of the application increases.
-
1. Organize Your Code
Organizing features and modules is crucial when building an Angular application. Team members should be able to locate the code quickly, so keep your folder structure as flat as possible. It is also important that the code snippets can be identified swiftly. This can be easily accomplished by adding the component's functionality to its name following this recommended pattern: feature.type.ts, as shown below:

Image courtesy of Angular
Using this feature-based approach to structure your code will make it DRY, reusable, and easy to maintain. Try to have at least one module per feature. Usually, a well built application is divided into a core module, a shared module, a routine module, and feature modules. Let's review each module type.
-
CORE MODULE
The core module is designed for singleton services that any element in the application can use. We don't want to import this type of service in each module, since this will create additional instances. Some examples of singleton services are LoggingService, ErrorService, and DataService. The core module must be imported only once by the root module to ensure that we can add a conditional inside the constructor to check it.
export class CoreModule {

  constructor(@Optional() @SkipSelf() parentModule: CoreModule) {

    if (parentModule) {

      throw new Error(

        'CoreModule is already loaded. Import it in the AppModule only'

      );

    }

  }

}
-
SHARED MODULE
The shared module is designed for common components, services, and other modules that will be used across multiple features. Usually this module is where we declare our Pipes, Directives, and other template components that are commonly used across the application, like a CalendarComponent and CurrencyPipe.
ROUTING MODULE
The routing module defines routes and provides the routing configuration. It creates the experience of a multiple-page application in a single-page application by allowing the user to navigate between different components after some events. It adds router configuration to the module's import and separates routing concerns from its companion module.
FEATURE MODULE
In addition to the modules detailed above, we can create other functionalities as feature modules. A feature module helps you to partition the app into focused areas, and it collaborates with the root module and with other modules through the services it provides and the components, directives, and pipes that it shares. This also enforces the single responsibility principle since a feature module must be designed to have one well-defined purpose. In fact, a hallmark of poorly-written code is modules that have more than one responsibility. So when you notice that one of your modules is getting bigger or too complex, consider splitting it into two or more modules with well defined roles.
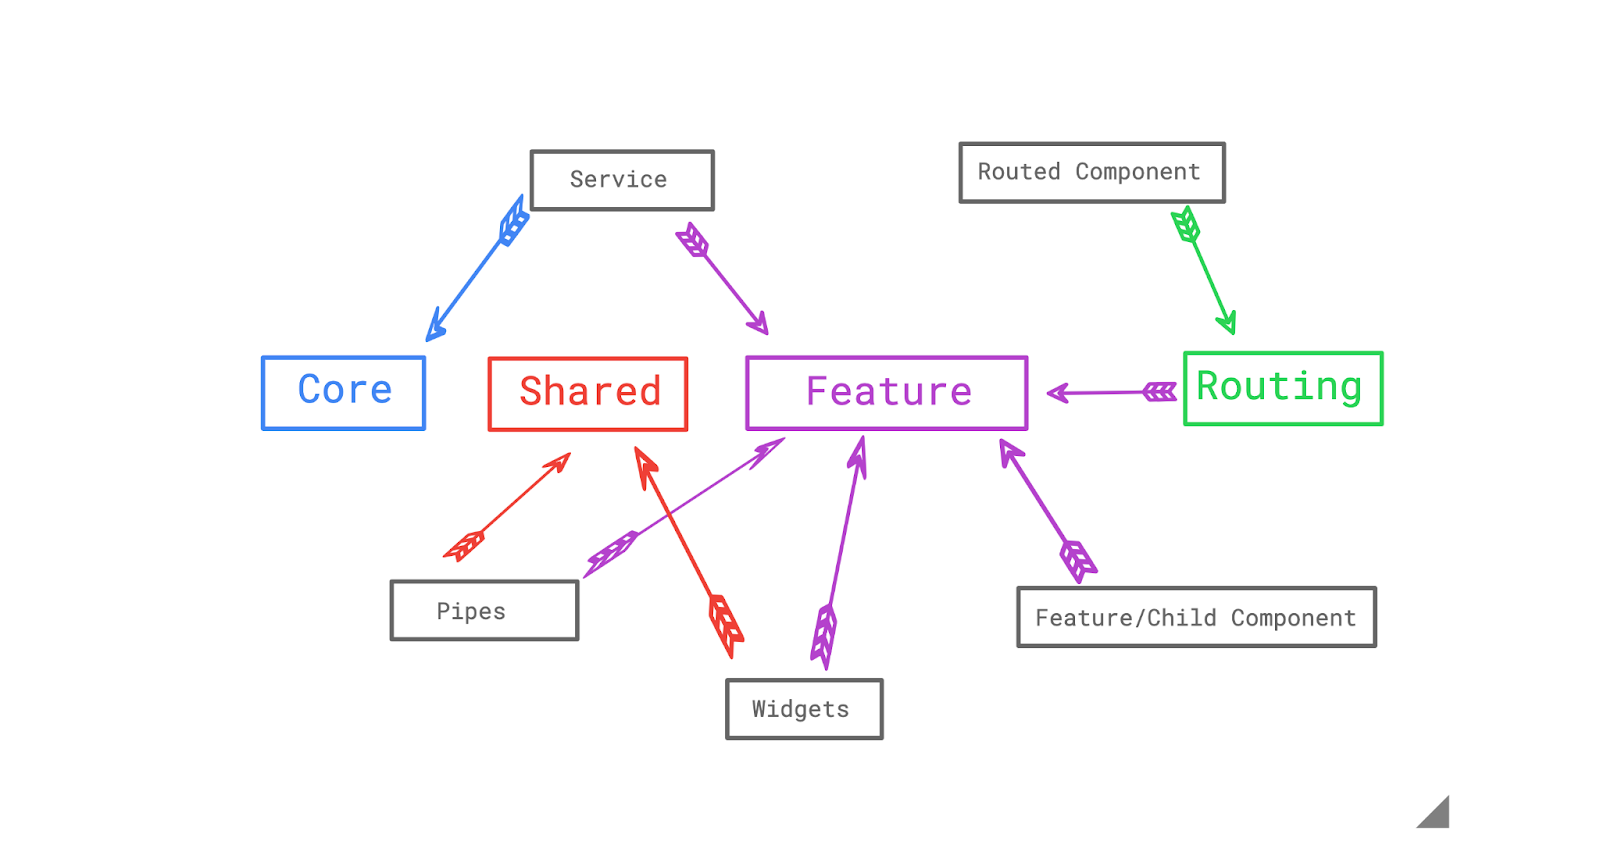
TYPICAL ORGANIZATION
The image below shows a typical way to define your modules. In general, widgets and pipes go into the Shared Module, services go into the Core Module, and routed components go into the Routing Module. The exception is when one of these is specific to a feature.
Architecture aside, there are a few specific changes that can improve your application's performance.
-
2. OnPush Change Detection Strategy
Angular Change Detection Strategy encompasses the methods by which the updates to the component are tracked and the component is triggered to Re-render. The purpose of this mechanism is to put the views in sync with their model. This model change can be triggered by a DOM event, an AJAX request, or timers.
On the Default Change Detection Strategy, every time a DOM event, an AJAX request, or a trigger by setTimeout or setInterval happens, Angular will verify if there was any change between the previous and the current state of the overall application model. This strategy is less efficient since the DOM is often re-rendered on child components, even if the change detected only affects the parent component.
This doesn't happen on the OnPush Detection Strategy. When using OnPush, whenever a parent element is updating values that are not passed as an input property to the child component, the child component will not be checked and re-rendered. So it's recommended to use the OnPush strategy on child components when they only depend on its inputs.
import {ChangeDetectionStrategy, Component} from '@angular/core';


@Component({

  // ...

  changeDetection: ChangeDetectionStrategy.OnPush

})
But the OnPush strategy can be tricky! When using OnPush Change Detection Strategy, we must work with immutable objects. If we don't, we might cause some bugs that are really hard to track. So in order to trigger a change detection in our component, whenever our input is an object or array, we need to change their reference. For example:
mutable -> this won't trigger the detection strategy
arr.forEach((num, index) => {

   return arr[index] = num * 2;

});
immutable -> this will trigger the detection strategy because the reference for the array was changed
arr = arr.map(num => {

   return num * 2;

});
-
3. Pipes Instead of Method Calls on the Template
@Component({

  template: `

...

    <p>Welcome !</p>

...

  `

})

export class UserComponent {

  @Input() user: { firstName: string, lastName: string };

  constructor() { }

...

  fullName() {

    return this.user.firstName + ' ' + this.user.lastName

  }

...

}
When we add a method call on the template, it can be executed several times, which will reduce the performance of the application. This happens because the method will be called every time the change detection runs. So if change detection runs 100 times, the function is called 100 times, even if the change happened in a part of the code that is not related to this method call.
There are two simple ways of solving this issue. One of them is calling the method on your component's controller and assigning the result to a variable that will be used on the template.
@Component({

  template: `

...

    <p>Welcome !</p>

...

  `

})

export class UserComponent {

  @Input() user: { firstName: string, lastName: string };

  fullName = '';

  constructor() {}


 ngOnChanges(changes: SimpleChanges) {

    if (changes.user) {

      this.fullName = this.calculateFullName();

    }

  }

...

  fullName() {

    return this.user.firstName + ' ' + this.user.lastName

  }

...

}
Another way to accomplish this is by using Pipes. A pipe is a way to transform a value for display on the template without transforming it in your controller. It takes your data as an input and transforms it to a desired output. A pure pipe is a function with the return value depending only on arguments that are passed to the function. Unlike a method call, a pure pipe transform is called only when the parameters change. This way, instead of being called several times, a pipe will be called only once.
@Pipe({

  name: 'fullName',

  pure: true

})

export class FullNamePipe implements PipeTransform {

  transform(user: any, args?: any):any {

    return user.firstName + user.lastName;

  }

}


@Component({

  template: `

...

    <p>Welcome !</p>

...

  `

})

export class UserComponent {

  @Input() user: { firstName: string, lastName: string };

  constructor() {}

}
-
4. Lazy Loading Feature Modules
By default, when the application starts, all of its modules are loaded at once, even though they are not immediately needed. One advantage of splitting the application into modules is the ability to load certain modules only when they are required, which keeps the initial bundle size smaller and helps the application to load faster.
To lazy load Angular modules, use loadChildren (instead of component) in your AppRoutingModule routes configuration.
const routes: Routes = [

  {

    path: 'lazy',

    loadChildren: () => import('./lazy/lazy.module').then(m => m.LazyModule)

  }

];
Don't forget to remove the ItemsModule from the AppModule, otherwise it will be loaded when the application bootstraps.
Summary
There are still several topics we haven't covered in this article, but these four tips are a good place to start, particularly for developers who are newer to designing Angular applications. These tips may also be used to improve existing applications since there's always room to make our code stronger!
Questions or comments? Share your experience below!
References
Angular: Organizing Features and Modules
Angular - Core and Shared Modules


