
If you've journeyed with us over the past several months, you know the basics of how to use Angular 2+, and you also know how to add some flare to your Angular projects by creating custom directives. So what else do you need to know before shipping your own Angular web application to production? You need to know how to use Routers.
Most modern web apps are Single Page Applications (SPAs). In other words, they're responsive websites with a fixed header and footer and dynamic content in the middle. To use SPAs well, you must know how to use Angular's new Router. We'll show you how to use a Router in this step-by-step tutorial, starting with creating a Router for the root component, which centralizes all routes declared in the main module (app.module.ts). (Clone the sample app covered in the article or download our demo here.)
Creating a Router for the Root Component
First, use Angular CLI to create a new app with routing as follows:
ng new angular-routing-demo –routing
You can also add the –routing parameter when creating new modules for your app:
ng g m secondary-module –routing
Angular CLI will then:
- Create the 'app-routing.module.ts' file, along with the usual files covered in the previous articles
- Add AppRoutingModule to ‘app.module.ts’ imports array
- Append the <router-outlet></router-outlet> tag to app.component.html
All direct routes should be rendered right below the router-outlet tag once they're visited.
This is the code inside app-routing.module.ts
In order to create app routes, you need to add an object to the routes array declared at the beginning of the file. This object should contain the following keys and values:
{path: <regular expression with path>, component: <component class file> }
To add a component to the object above, we need to first create a component using the Angular CLI as usual:
ng g c welcome-page
Now modify 'app-routing.module.ts' to point to the recently created component:
Setting the path as an empty string will trigger the WelcomePageComponent at the base URL. In this case, Angular CLI’s default dev server base URL would be: http://localhost:4200
If you were to inspect the page in order to see where the component has been rendered, this would be the output:
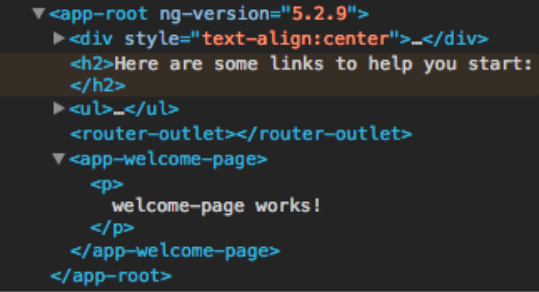
Other routes on the same level would make angular remove <app-welcome-page></app-welcome-page> and append another component tag in its place.
Adding a Second Component
Before we can navigate between two different routes, we need to create a new component with:
ng g c grocery-list
Next, add a file named grocery-list-routing.ts to the component you just created. (Note that we’re not creating a routing module this time, so it’s not necessary to add the ‘.module’ naming convention to the file.) This file should contain the route array for that specific component:
This is a similar file to the one that’s created by the CLI at first Run, with the slight difference that, instead of creating a Routing Module, it only exposes an array of routes added to a constant.
This constant should then be imported into app-routing.module.ts and then added to the main route array. An easy way to do this is to use the ES6 spread operator (three dots), like so:
In this example, the routes added to the groceryListRoutes constant will be prepended to the global routes array.
Navigating Between Two Different Routes
Now that you've created a second component, it’s time to show how to navigate between them. Go to app.component.html and add two list items with anchor tags inside the existing, unordered list, and instead of href, add the routerLink attribute:
An empty routerLink attribute value will take us to the welcome page, and groceries will take us to the grocery list page. If you want to change a portion of the screen and still create meaningful URL Routes without refreshing the page, you can use children routes. To do this, simply add another array of routes to a children attribute inside the route array you want to augment:
Note that ‘:name’ is the URL parameter identifier; this will be replaced by the parameter to be sent to the child route itself. In order to create a link to that child route, the name parameter must be appended to the routerLink attribute:
So if we were to click on the anchor tag, 'See banana details,' the value 'banana' would be passed as a parameter to the child route. If we want to get the value that has been passed as ':name,' we need to inject the ActivatedRoute to the component, like so:
Now, in order to get the parameter value, we need to subscribe to the route parameter’s Observable. This must be done as soon as the component has been loaded. (A more in-depth example has been implemented in the code demo below.)
Creating Auth Guards
We can also create auth guards with the Angular Router. Auth guards serve as an additional step between the route activation and the actual rendering of the component. An auth service can be added to ‘canActivate’ or ‘canDeactivate’ inside the route object as follows:
ng g g logged-user
This generates a guard service that will be activated once the route path is triggered. The guard service has to implement the canActivate/canDeactivate method. The code inside this method can be customized to validate the authorization information about the user and return true if the user is properly authenticated.
Conclusion
Angular’s Router library exposes many different features, such as capturing events related to navigation start and/or navigation end and snapshots of the Activated Route, which you can subscribe to listen for changes. To see all of the topics we covered today in action, be sure to download the demo. Now that you know how to use Angular's Router to allow users to navigate between views, you're ready to use Angular to create your own web app.
Useful links:
https://angular.io/guide/router
https://github.com/angular/angular-cli/blob/master/docs/documentation/stories/routing.md


