
As a software engineer, you might need to consume an API that is not completely ready yet, or maybe you're still waiting for the API key that is taking forever to be provided. So why not test happy paths, edge cases, failures, timeouts, and performance constraints with API stubs through a mocked HTTP server? Here's why WireMock is a great solution!
So, What is WireMock?
WireMock was initially created by Tom Akehurst in 2011. As an HTTP mock server that can map specific requests, stub them, and, like a proxy, return predefined responses according to your test cases, it's an easy, quick, and robust way of mocking APIs.
Best of all, we can use WireMock for integration tests!
Let’s suppose you are developing a new microservice that depends on other ones (Figure 1). We'll assume that all meetings with the involved stakeholders have already happened and that all contracts have been well-defined and shared across development teams. So, do you have to wait until all other APIs are ready and functional to run all test cases you need and make sure everything is working as expected? No, you don't!

Figure 1. Hypothetical scenario: your microservice consumes three other ones that are not fully developed yet.
You can use WireMock as a dependency of your application or else to download the standalone JAR to speed up your development and avoid future issues when delivering your solution! The most updated WireMock version is compatible with Java 8+ (you also might find a Java 7 version out there, but it is deprecated now).
So, let’s learn by doing!
Practice Time!
To explore the various WireMock features, let's use the Stocks API that consumes a third-party one -- Financial Facts -- to get financial data in real-time. Since we don’t have access to this API yet, we will use WireMock to stub some responses for us. This scenario can be visualized in the graph below:

Figure 2. WireMock in action.
Project Setup
Our API is a Spring Boot application created with Java 8, Gradle, and Spring 2.6.2. You can use Spring Initializr to create it (don’t forget to add Spring Web and Lombok as dependencies) and import this project into your favorite IDE.
The next step is to add the WireMock dependency; if you are using Gradle, please go ahead and add the following line into your build.gradle file:
testImplementation 'com.github.tomakehurst:wiremock-jre8:2.32.0'
If you prefer to use Maven, you can add the following dependency on your pom.xml file:
<dependency>

    <groupId>com.github.tomakehurst</groupId>

    <artifactId>wiremock-jre8</artifactId>

    <version>2.32.0</version>

    <scope>test</scope>

</dependency>
Project Structure: Resources
What are resources? A resource is a fundamental concept of a RestFul API and can be defined as an identifiable data model that may or may not have relationships with others. In our solution, we have as resources StockResource.java and FinancialFactsResource.java (storing data from the Financial Facts API).
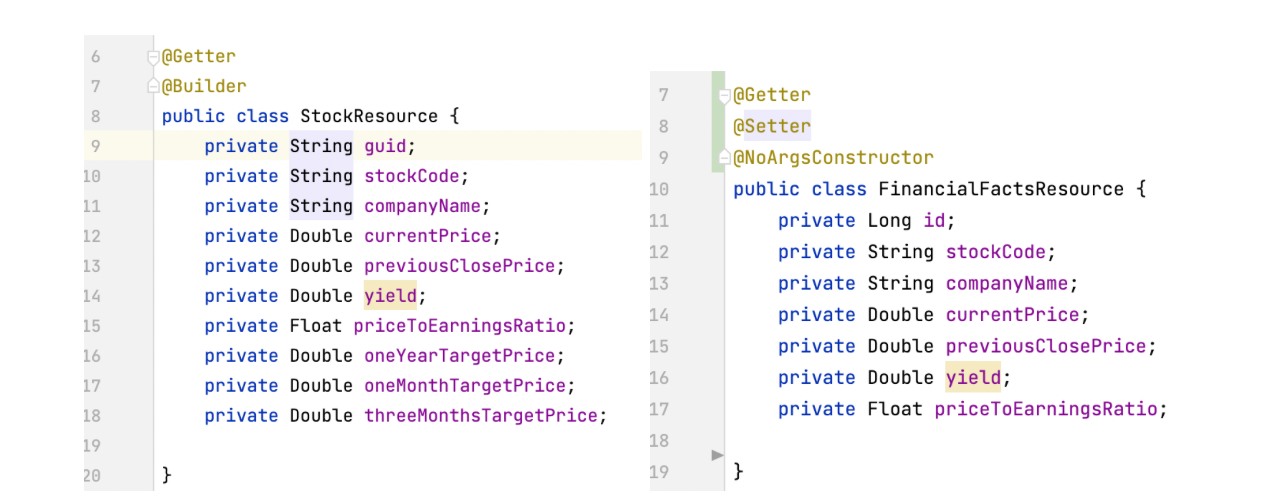
Figure 3. Resources used by StockAPI.
Project Structure: Controller
The StockController.java class handles all incoming requests. It has a unique GET endpoint /api/stocks/{code} and calls StockService.java to retrieve data from the Financial Facts API responsible for returning some financial numbers about a given stock code.

Figure 4. StocksController.java has a GET endpoint exposed by our StocksAPI.
Project Structure: Stock Service
The StockService.java class has our API business logic:
- findStockByCode: calls our fake external API to retrieve financial data for a given stock code;
- performInternalBusinessLogic: performs any kind of business logic over retrieved data; as this is an application created for learning purposes only, we are not applying any kind of data manipulation to it.

Figure 5. StockService.java class created to host the business logic.
Project Structure: Integration Tests
This class hosts our tests; we are using WireMock features to stub Financial Facts API data.

Figure 6. Initial configuration of our integration tests class.
Technical Implementation Notes:
- WireMockServer setup: we are creating a fake HTTP server before running all test methods; we are also creating a WireMockConfiguration that allows us to set a few configuration parameters:
- Port number: Statically set the HTTP port number. It defaults to 8080;
- HttpsPort: Statically set the HTTPS port number. It defaults to 8443;
- DynamicPort: Randomly assign the HTTP port on startup;
- DynamicHttpsPort: Randomly assign the HTTP port on startup; (for more details about those options, feel free to take a look at the WireMockConfiguration official documentation);
- WireMock.configureFor: here we are setting the same host/port previously defined for the external API in the application-wiremock.yml file (note that we are also using WireMock Spring profile active on this class);

Figure 7. application-wiremock.yml file.
- urlToStub: this is the endpoint in the external API that we are stubbing on our test class; and
- stockCode: this is just a sample stock code we are using here.
Test Methods
Now let’s cover our test methods. All of them follow the same structure detailed below:
- Wiremock stub setup:
- Wiremock.get: HTTP method of stubbing endpoint;
- urlMatching: endpoint we are stubbing;
- withHeader: header type specified on your stubbing endpoint;
- withBody: here we specify our payload in-line; another and more practical option would be to use withBodyFile;
- withBodyFile: this is a more practical approach to specify a stub response for your calls in a JSON format; note that you need to put your files inside src/test/resources __files folder as a regular JSON data and set the file path/name relative to this folder;
- withStatus: expected status code returned by your stub service;
- MockMvc: regular Spring configuration used to test the web layer; by autowiring this dependency, we can call our endpoints in exactly the same way as if it were processing a real HTTP request and load the entire Spring context but without the cost of starting a server (note that we are using the annotation @AutoConfigureMockMvc for it);
- Through MockMvc, we make a GET request to /api/stocks/{code} endpoint, print request/response data, and assert the returned HTTP status code and response body parsing a previously created resource object and comparing the data; and finally
- Verifying WireMock calls: you can assert your WireMock calls in several ways; here we are checking if we really made a GET request to the stub URL.

Figure 8. Test method using WireMock stub with declarative response body.

Figure 9. Test method using WireMock stub with response located in an external file.
Project Structure: Package Hierarchy
Our final project structure is detailed in the image below. All source code can also be found here.

Figure 10. Final project structure.
What Else Should I Know about WireMock?
In the previous section, we gave a practical example of how to create integration tests for our StocksAPI and stubs external rest calls with Wiremock, but there are a few other things you should be aware of:
Running WireMock as a Standalone Mocked HTTP Server
Let’s say we want to use WireMock to stub some external API calls, running it in a separate server. To do this, download the jar or run it using a Dock container:
Once you've downloaded the standalone JAR, you can run it by typing the following command on a terminal window:
$ java -jar wiremock-jre-8-standalone-2.32.0.jar

Figure 11. Terminal window after starting up WireMock in a standalone process.
You can also use a Docker image, creating a container, as detailed below:
docker run -it --rm -p 8080:8080 --name wiremock wiremock/wiremock:2.32.0
What else can you do?
Well, let’s suppose you want to save some API request and the respective responses easily. In this case, you can use WireMock recorder, available at http://localhost:8080/__admin/recorder. (Please note that the host and port may differ depending on where and how you are running it.)

Figure 12. WireMock Recorder
Once on this page, you can add an API target URL and hit the record button. Then use the curl command to hit any endpoint passing through the WireMock server acting as a proxy:
$curl http://localhost:8080/sample-endpoint/samplePathVariable
Finally, after clicking on the stop button, generated mappings can be visualized either by accessing http://localhost:8080/__admin/mappings or by opening the mappings folder created in the same folder you started the standalone jar.
For more information about the many options WireMock offers to you, please check out the official documentation.
Conclusion
In this article, we covered how handy WireMock is for stubbing API calls on our integration tests for situations where external dependencies are not fully developed yet, accesses were not provided, or we just don’t want to make those external calls every time when running a build pipeline.
WireMock has plenty of useful features that we did not cover in this article, so I invite you to take a look at the official documentation and explore this amazing tool in more detail!


