Firebase is a customizable mobile platform with several common features such as authentication. For those just getting started with the platform, I've put together a brief tutorial on how to integrate with an Android application.
We will start with a introduction to Firebase, including some of its components. For the purposes of this article, it is assumed that you, the reader, is already familiar with the basic components of Android applications. If you're not familiar, or just want to brush up on your knowledge, I'd recommend taking a look at this article on Android Basics.
Once we've established what Firebase is and how it works, we'll apply it to build an Android app solution. So, let's get started!

Firebase
To solve these questions and help you to quickly develop a high-quality app, grow your user base, and earn more money, Google created the mobile platform known as Firebase! The platform is made up of complementary features such as a database and authentication that you can mix with your application to fit your needs.
Features
- Real-time Database
- Store and sync data in real-time with JSON format.
- Authentication
- A complete authentication system that supports email & password, Facebook, Twitter, GitHub and Google Sign-In.
- Cloud Message
- Deliver and receive messages across platforms reliably using a cross-platform (Android, iOS and Web) tool known as Firebase Cloud Messaging.
- Storage
- Store and serve user-generated content such as images, audio, and video directly in your mobile app, using the Firebase SDK's.
In this article we will talk about how to use the real-time database and authentication for the Android chat that we will build.
Adding Firebase to Your Project
Setup Authentication
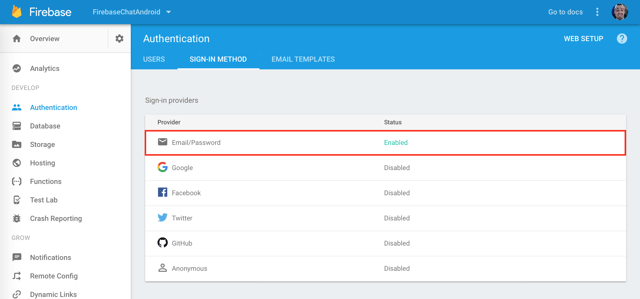
To use the authentication provider, you need to enable it in the Firebase console. Go to the Sign-in Method page in the Firebase Authentication section to enable Email/Password sign-in, and any other identity providers you want for your app.
After that you can include the library in your gradle file:
compile 'com.google.firebase:firebase-auth:10.2.1'
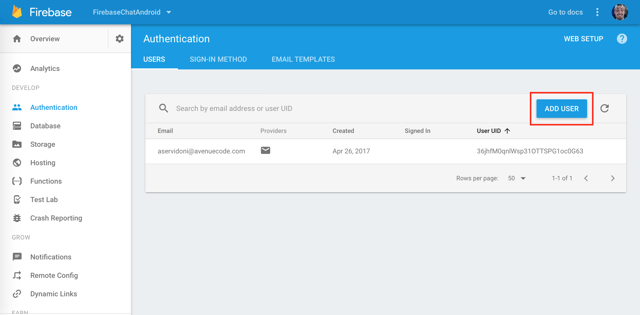
Let's create a example user so we can test the login after we implement it. Navigate to the Users tab and click the Add User button.
Setup Real-Time Database
For the real-time database we don't need to "turn it on" in the console. Just add the library dependency in your gradle file:
compile 'com.google.firebase:firebase-database:10.2.1'
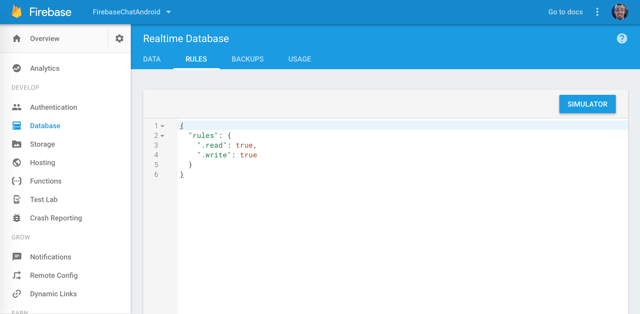
To finish, let's change the rules of the database so we can read and write it. Just set both to true, as shown in the example below.
(For more information about database rules, please see the links in the references section at the end of this article.)
Building the App

App Structure
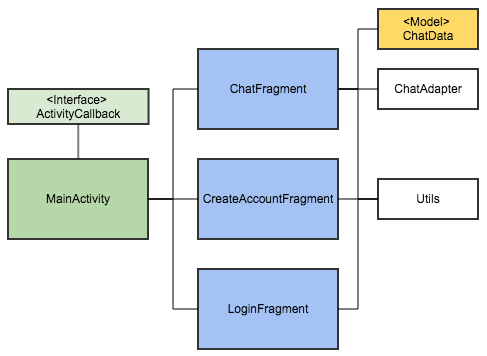
To achieve this behavior, a callback called ActivityCallback was created, which contains all the necessary methods:
- openChat()
- Replace the current fragment to show the ChatFragment.
- openCreateAccount()
- Replace the fragment to show CreateAccountFragment.
- logout()
- Replace the fragment to show the LoginFragment.
The MainActivity will implement this callback, and all fragments in the attachment process will get a reference from this callback.
Step 1 - Creating the Activity and Callbacks
We will need a layout to be the container for the fragments, so for the activity, create a layout file called activity_layout.xml and add a frame layout to it.
<FrameLayout xmlns:android="http://schemas.android.com/apk/res/android"
     xmlns:tools="http://schemas.android.com/tools"
     android:id="@+id/container"
     android:layout_width="match_parent"
     android:layout_height="match_parent"
     tools:context="com.dekoservidoni.firebasechat.MainActivity">
</FrameLayout>
public interface ActivityCallback {
    void openChat();
    void openCreateAccount();
    void logout();
}
To do so, we will open the login fragment as a default. Therefore, we will ad it in the OnCreate method. For the openChat, openCreateAccount, and Logout, we will replace the current fragment to whichever is desired. So in the end, your activity will look like this:
public class MainActivity extends AppCompatActivity implements ActivityCallback {

    /// Lifecycle methods

    @Override
    protected void onCreate(Bundle savedInstanceState) {
        super.onCreate(savedInstanceState);
        setContentView(R.layout.activity_initial);
    }

    /// Callback methods

    @Override
    public void openChat() {
    }

    @Override
    public void openCreateAccount() {
    }

    @Override
    public void logout() {
    }
}
Step 2 - Login / Create account Screens
In this second step, we will create the login and create account fragments. Afterwards, we will integrate with the Firebase authentication tool.
The screens will be very simple to implement. The login form will contain two EditTexts (User email and password) and two buttons(Sign in and Create account) - one to do the login, and the second to navigate to our create account fragment. The CreateAccount form will contain two EditTexts, like the login, and one button to create the account
Now that we have the layouts, let's create the fragments. One important thing to remember is to attach the ActivityCallback from MainActivity to both fragments. We can use two methods of fragment to do so: onAttach and onDetach
With the first one, onAttach, we will cast the context to the callback:
@Override
public void onAttach(Context context) {
    super.onAttach(context);
    mCallback = (ActivityCallback) context;
}
And with the second one, onDetach, we will set the callback reference to null, (to avoid needless leaks with a reference in memory).
@Override
public void onDetach() {
    super.onDetach();
    mCallback = null;
}
Now, let's go back to the MainActivity to add the code to open the login fragment when we first enter the application. We can also implement the content of the callbacks for opening the Create Account and Logout, since we already have both of these fragments.
The login fragment will be added in the onCreate() method:
@Override
protected void onCreate(Bundle savedInstanceState) {
    super.onCreate(savedInstanceState);
    setContentView(R.layout.activity_initial);

    getSupportFragmentManager()
            .beginTransaction()
            .add(R.id.container, LoginFragment.newInstance())
            .commit();
}
To open the Create Account, go inside the openCreateAccount() method:
@Override
public void openCreateAccount() {
        getSupportFragmentManager()
            .beginTransaction()
            .replace(R.id.container, CreateAccountFragment.newInstance())
            .commit();
}
And for the Logout, we will call the login fragment again. It will be called in the chat fragment, in Step 3 of this article:
@Override
public void logout() {
    getSupportFragmentManager()
            .beginTransaction()
            .replace(R.id.container, LoginFragment.newInstance())
            .commit();
}
Go back to the login fragment. You can call the callback methods as button actions so we can begin to "link" the flow of the app:
final Button signInButton = (Button) root.findViewById(R.id.sign_in_button);
    signInButton.setOnClickListener(new View.OnClickListener() {
        @Override
        public void onClick(View view) {
            attemptLogin();
        }
    });

    final Button createAccount = (Button) root.findViewById(R.id.create_account_button);
    createAccount.setOnClickListener(new View.OnClickListener() {
        @Override
        public void onClick(View view) {
            mCallback.openCreateAccount();
        }
    });
The method above called attemptLogin() will be used in the next section, so don't worry about it for now!
OK, we now have all the basic setup - time for the fun part! We're now ready to integrate with the Firebase Authentication tool!

The authentication tool provides several methods that we can use to manage Users in our application. We will use two of them for our purposes:
- signInWithEmailAndPassword
- createUserWithEmailAndPassword
To use them we need to have a reference of the FirebaseAuth object. It's implementing the single pattern, so we just need to get an instance of this. Let's declare the object in the fragment class:
private FirebaseAuth mAuth;We can also get the instance of it in the onCreateView method while the fragment is being created:
mAuth = FirebaseAuth.getInstance();Obviously, this needs to be done in both fragments, Login and CreateAccount!
Create New User Account
Now that we have the instance from FirebaseAuth object, in the CreateAccount screen we can call the createUserWithEmailAndPassword in the click listener of the button. This method accepts two String parameters, email and password, so just retrieve from the EditTexts in the UI and send.
mAuth.createUserWithEmailAndPassword(email, password)But how can we test whether the operation was completed successfully or with an error? Using the previous method, return a Task. In this object, you can set an OnCompleteListener to determine whether the oepration was successful.
Task<AuthResult> task = mAuth.createUserWithEmailAndPassword(email, password)
task.addOnCompleteListener(getActivity(), new OnCompleteListener<AuthResult>() {
        @Override
        public void onComplete(@NonNull Task<AuthResult> task) {
        }
    });
The task object has another two listeners: OnFailureListener and OnCompleteListener. The first one is called only when an operation is not successful, and the second one, every time any operation is executed. For our purposes, we will only use the OnCompleteListener.
When the onComplete method is called, we need to verify whether the task was successfully executed and do the logic. When the user account is created, the Firebase does the login automatically, so we don't need to do the login call again. Instead, we'll simply call the callback method mCallback.openChat() to navigate to the chat screen.
This will be called in as an action of the Create Account button in the fragment. The final code will be something like this:
private void createAccount() {
    String email = mEmail.getText().toString();
    String password = mPassword.getText().toString();

    mAuth.createUserWithEmailAndPassword(email, password).addOnCompleteListener(getActivity(), new OnCompleteListener<AuthResult>() {
        @Override
        public void onComplete(@NonNull Task<AuthResult> task) {
            if(!task.isSuccessful()) {
                // Show error message (dialog or toast)
            } else {
                mCallback.openChat();
            }
        }
    });
}
Logging in Existing Users
Now, to login an existing user, we'll use almost exactly the same steps as we did when creating a new account. The only difference is which method of FirebaseAuth we'll use:
mAuth.signInWithEmailAndPassword(email, password)The parameters are the same as what we see from the UI screen (email and password). The difference here is that instead of receiving a task instance onSuccess callback, we will only receive the AuthResult object that contains the information about the logged user.
So to verify if the action was or was not successful, we need to add the OnFailureListener and do the logic there. For example, we can show a dialog or a toast to the user alerting them to the failed login.
Remember the method attemptLogin() we created earlier? Now it's time to implement it, ensuring tht the call for the signIn method is inside it:
private void attemptLogin() {
    String email = mEmail.getText().toString();
    String password = mPassword.getText().toString();

    mAuth.signInWithEmailAndPassword(email, password).addOnSuccessListener(new OnSuccessListener<AuthResult>() {
        @Override
        public void onSuccess(AuthResult authResult) {
            if (mCallback != null) {
                mCallback.openChat();
            }
        }
    }).addOnFailureListener(new OnFailureListener() {
        @Override
        public void onFailure(@NonNull Exception e) {
            // Show error message (dialog or toast)
        }
    });
}
Step 3 - Chat Screen
Now let's build the final (and most important) part of the app 😁

The layout will be composed by a RecyclerView, with every message shown as an item in the list so you can customize the rows. We'll also include one EditText to receive the input from the user.
For the item row, we'll create a CardView layout with two TextViews, one for the username and the other for the message itself.
Now that we have the layouts, we can create the fragment and the adapter for the screen. Don't forgot to attach the ActivityCallback from MainActivity to both fragments (again using the two fragment methods of onAttach and onDetach).
Another thing we will use is the OptionsMenu of the fragment. This is where we will insert the "logout" action, calling the logout callback. It will look like this:
@Override
public void onCreateOptionsMenu(Menu menu, MenuInflater inflater) {
    super.onCreateOptionsMenu(menu, inflater);
    inflater.inflate(R.menu.menu_chat, menu);
}

@Override
public boolean onOptionsItemSelected(MenuItem item) {
    if(item.getItemId() == R.id.action_logout) {
        mCallback.logout();
    }

    return super.onOptionsItemSelected(item);
}
Note: the creation of the adapter will not be covered here. If you need some help or would like more information about it, you can check out this link with documentation and examples.
Now that all fragments, the adapter, and layout are set up, it's time to integrate with the Firebase. In this fragment, we will need to have the FirebaseAuth instance to logout the user, the DatabaseReference, which serves as the reference of the database to write/read the chat messages, and a FirebaseDatabase to get the specific DatabaseReference from.
Let's setup all the objects that we will use. For this example I created a helper method to do this, which we will call in the OnCreate:
private void setupConnection() {
    mAuth = FirebaseAuth.getInstance().signOut();

    FirebaseDatabase database = FirebaseDatabase.getInstance();
    mReference = database.getReference(Constants.DATABASE_NAME);

    mReference.addValueEventListener(new ValueEventListener() {
        @Override
        public void onDataChange(DataSnapshot dataSnapshot) {
            Log.d("CHAT","SUCCESS!");
        }

        @Override
        public void onCancelled(DatabaseError databaseError) {
            Log.e("CHAT","ERROR: " + databaseError.getMessage());
        }
    });
}
Data Structure
Before we begin to write and read data from the database, let's create a model that will represent the structure of a message item in the database.
Basically, our JSON format will be a list of message "objects" that will contain the name of the user(email), id of the message and the message itself.
It will be something like this:
{
  "chat" : {
    "1493842922925" : {
      "id" : "gINhwWCz1QbXvm9eltHT6HXYFuK2",
      "message" : "hello",
      "name" : "Andre"
    },
    "1493842945123" : {
      "id" : "rCDezre93bXvm9eltHTAHXYFK6",
      "message" : "How are you?",
      "name" : "Silva"
    }
  }
}
So, for our project, let's create a class called ChatData with three String fields. One detail: don't forget to add an empty constructor and public getters and setters for the class variables. This will be important when we go to save and read the values from our database.
public class ChatData {

    private String mName;
    private String mId;
    private String mMessage;

    public ChatData() {
        // empty constructor
    }

    public String getName() {
        return mName;
    }

    public void setName(String name) {
        mName = name;
    }

    public String getId() {
        return mId;
    }

    public String getMessage() {
        return mMessage;
    }

    public void setMessage(String message) {
        mMessage = message;
    }

    public void setId(String id) {
        mId = id;
    }
}
For more information about how to structure the JSON, consult this link.
Now that we have our model, let's read/write the values in our database!
Reading Data from the Database
The FirebaseDatabase gives us several methods and a listener to verify things such as when the entire database has been updated, when a specific child was updated, etc.
In this case, we will get the updates for all changes, so you can add more people to the chat and create a room for talks, for example.
So for this, we add the ValueEventListener to the DatabaseReference. It contains two methods: one for success, onDataChange, that will return the snapshot of the database, and one for error, onCancelled, which is called in the event that this listener failed at the server due to security and/or Firebase Database rules.
A DataSnapshot instance contains all the data from a firebase database. Any time you read Database data, you receive the data as a datasnapshot.
It will be returned in the listener methods that you attach to the DatabaseReference:
- addValueEventListener(ValueEventListener),
- addChildEventListener(ChildEventListener),
- addListenerForSingleValueEvent(ValueEventListener).
Essentially, these are efficiently-generated immutable copies of the data from a firebase database. They can't be modified, and will never change.
Now that we know how to listen for data changes, let's go back to our chat app and handle the dataSnapshot of the callback.
To do this we need to parse all the items from the snapshot response. We can use a for loop, as follows:
for(DataSnapshot item : dataSnapshot.getChildren()) {
    ChatData data = item.getValue(ChatData.class);
    mAdapter.addData(data);
}

mAdapter.notifyDataSetChanged();
Writing Data in the Database
The writing operations are done with the setValue() method to save to a specified reference, replacing any existing data at that path. You can write the following types in the database:
- String
- Long
- Double
- Boolean
- Map
- List
- Custom Objects
For the custom objects, the class that defines it must have a default constructor that takes no arguments and and public getters for the properties to be assigned.
The contents of your object are automatically mapped to child. Using a Java object also typically makes your code more readable and easier to maintain. So in our case, ChatData will be our custom object 😁.
Now in our app let's add the setValue when the user clicks on the action button of the keyboard:
mChatInput = (EditText) root.findViewById(R.id.chat_input);
    mChatInput.setOnEditorActionListener(new TextView.OnEditorActionListener() {
        @Override
        public boolean onEditorAction(TextView textView, int i, KeyEvent keyEvent) {

            ChatData data = new ChatData();
            data.setMessage(mChatInput.getText().toString());
            data.setId("userId");
            data.setName("userName");

            mReference.child(String.valueOf(new Date().getTime())).setValue(data);

            return true;
        }
    });
In the code above we get the reference from the input EditText and set the EditorListener. With the action method, we get the child from the database reference object and set the content with our custom object. We use the child as a timestamp so we can have all the information changed in the chat.
You can use the username as child so that every time you update the database, the specific child (if already exists) will be updated.
Conclusion
That’s it! Now we have a real-time chat app in Android using the Firebase platform! As we can see, this excellent solution from Google provides us with an easy-to-implement platform for use with our apps, that requires minimum time implementing the backend.
The complete project is in my Github, feel free to use it and share your feedback! Github Project
References
The documentation of Firebase is very complete and can be found in the following links
Author
André Servidoni
André Servidoni is an Android Engineer at Avenue Code. He is a new technologies enthusiast, and he is addicted to PS4.


