
Designing and writing tests aren't the most exciting things in the world, we know, but tests are absolutely essential for any app you write. They might be the difference between a shining 5-star app on the AppStore, or a bug-ridden collection of code. We all know what Unit Tests are and how to write them, but since XCode 7, Apple has introduced us to UI tests inside their IDE. With these tests, you can record a user's interactions with your app and check to see whether it's behaving as it should.
Viper
What is Viper
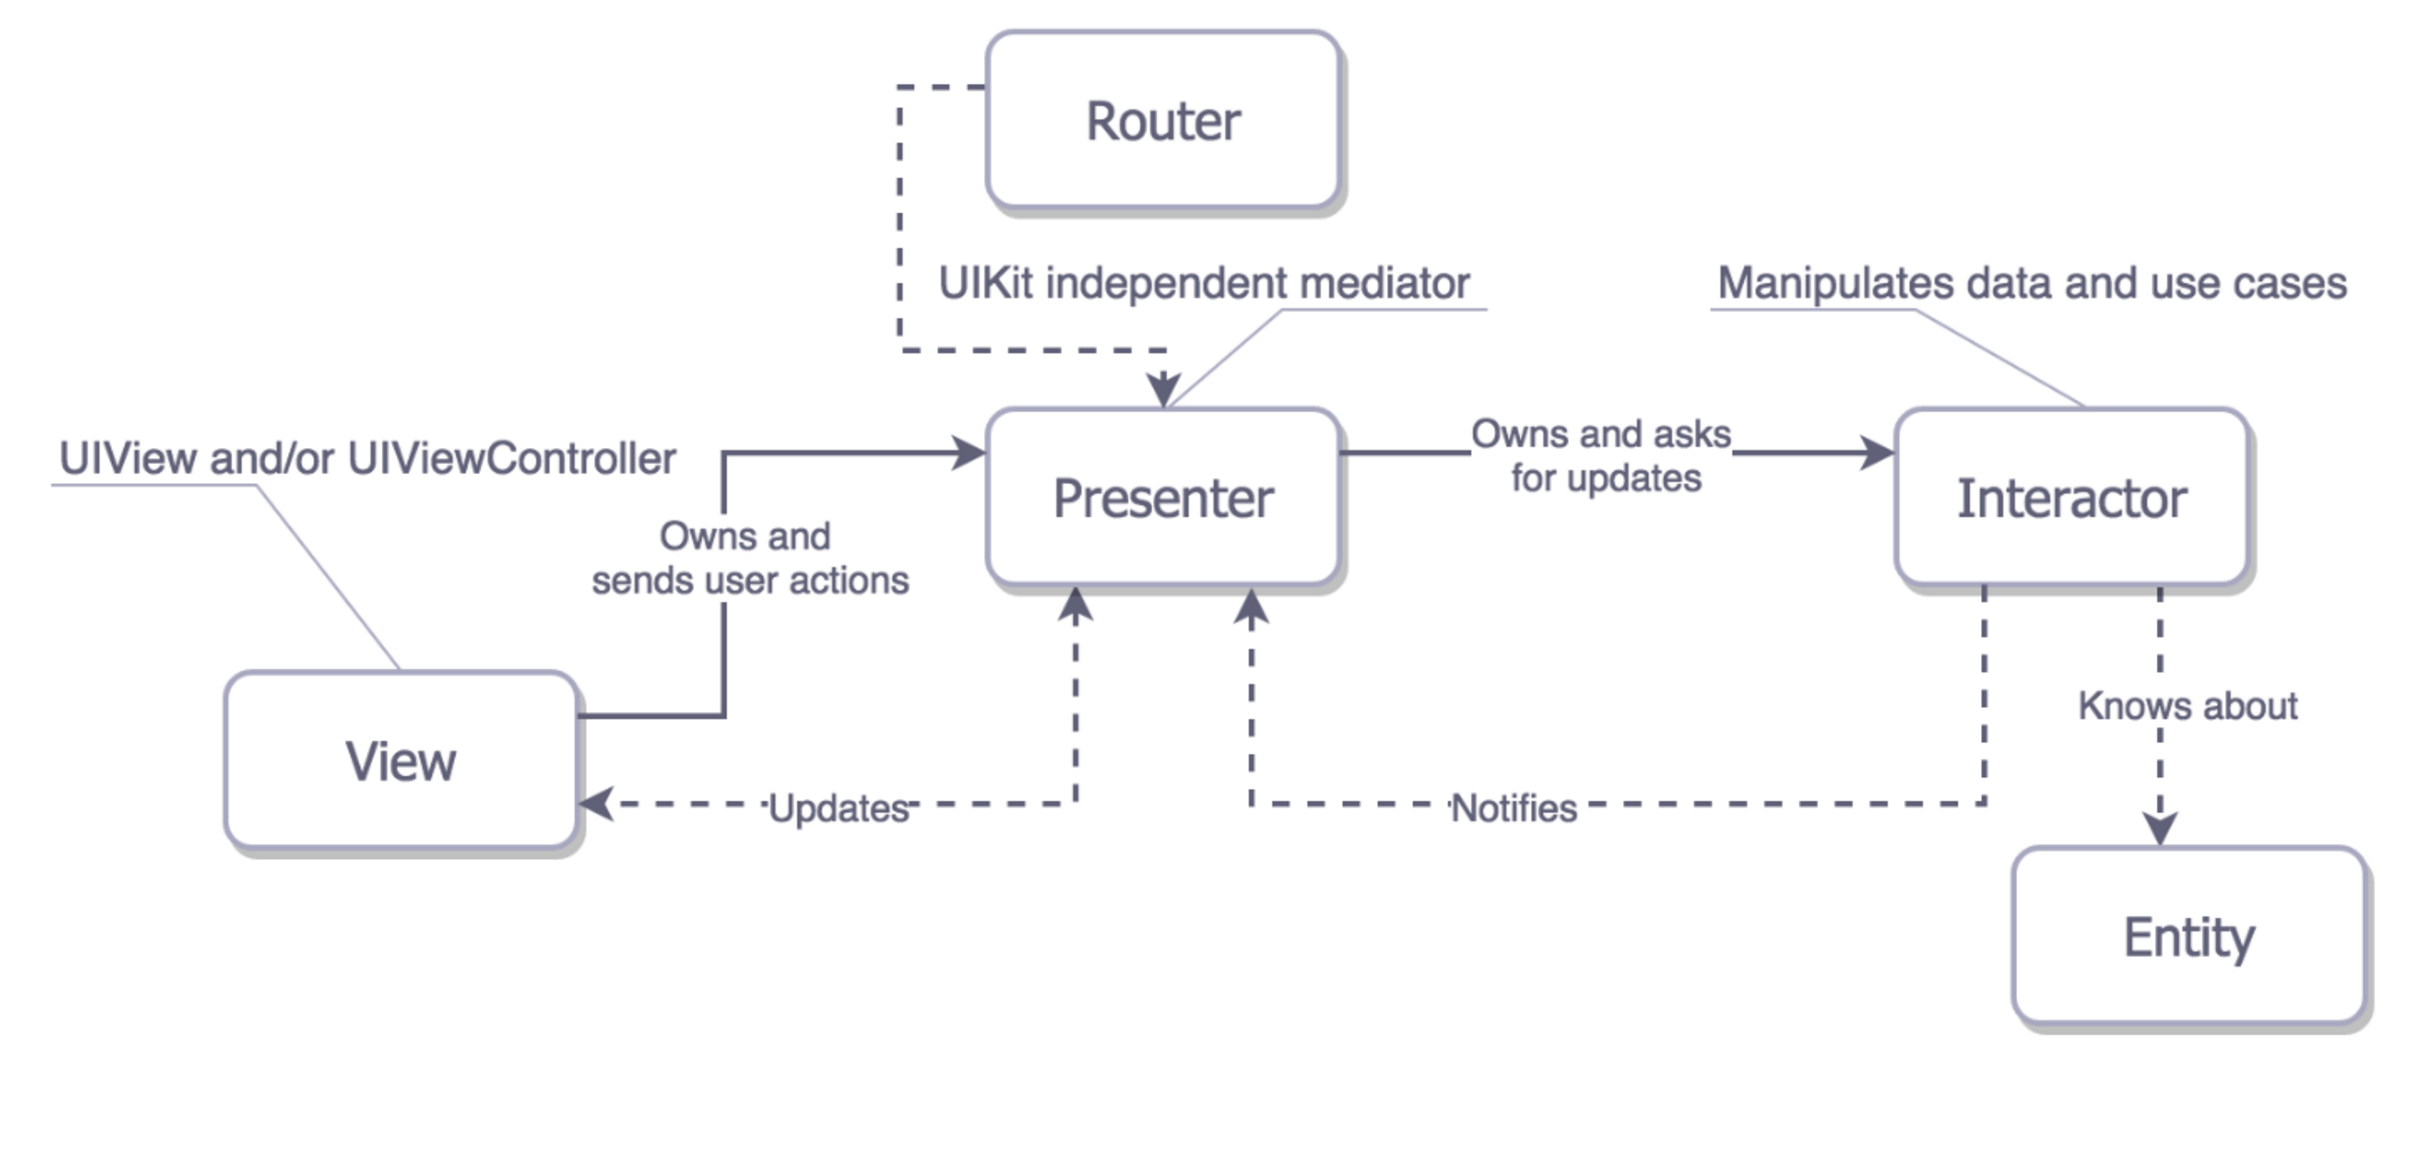
View
protocol ViewInterface {
 func display(name: String, image: UIImage)
}
Interactor
protocol InteractorInterface {
    func fetchUser()
}
Entity
struct User {
    let name: String
    let image: UIImage
}
Router
protocol RouterInterface {
    func logout()
    func goToAnotherPage()
}
UI tests with XCTest
        let app = XCUIApplication()
        let element = app.children(matching: .window).element(boundBy: 0).children(matching: .other).element.children(matching: .other).element.children(matching: .other).element.children(matching: .other).element
        element.tap()
        let logoutButton = app.buttons["Logout"]
        logoutButton.tap()

let app = XCUIApplication()
app.launch()
let image = app.images["profileImage"]
XCTAssert(image.exists)

The accessibility label is your best friend when developing an iOS app. It provides users who have hearing impairments with a way to navigate through your app and also helps you better test your UI.
What About Viper?
You must be asking yourself why I introduced Viper to you in the first place. The tests we did could be done with MVC, sure, but what if you have to test something that's deeper down in your app? Since Viper is so modular, you can write your classes thinking about tests, which make them extremely injectable. You can also create a class solely for instantiating all the elements of Viper, where you can inject anything you want. In our example, I created a builder called ProfileBuilder that instantiates all elements of Viper and returns the Router element.
final class ProfileBuilder {
        static func build(withUser user: User) -> ProfileRouter {
        let storyboard = UIStoryboard(name: "Profile", bundle: nil)
        if let viewController = storyboard.instantiateInitialViewController() as? ProfileViewController {
            let interactor = ProfileInteractor()
            let presenter = ProfilePresenter(viewInterface: viewController, interactor: interactor)
            let router = ProfileRouter(viewController: viewController, presenter: presenter)
            viewController.presenter = presenter
            interactor.presenter = presenter
            presenter.router = router
            presenter.user = user
            return router
        }
        fatalError("Oh no, something went wrong")
    }
}
let user = User(name: "Test", image: UIImage(named: "profileImage"))
let profileRouter = ProfileBuilder.build(withUser: user)
window = UIWindow(frame: UIScreen.main.bounds)
window?.rootViewController = profileRouter.viewController
window?.makeKeyAndVisible()

let app = XCUIApplication()
app.launchArguments = ["UITEST"]
app.launch()
let image = app.images["profileImage"]
XCTAssert(image.exists)
let args = ProcessInfo.processInfo.arguments
if args.contains("ProfileUITest") {
   let user = User(name: "Test", image: UIImage(named: "profileImage"))
   let loginRouter = LoginBuilder.build(withUser: user)
   window = UIWindow(frame: UIScreen.main.bounds)
   window?.rootViewController = loginRouter.viewController
   window?.makeKeyAndVisible()
} else {... instantiate another page...}

Wrapping Up


