How long did it take for you to roll out an MVP project that validated that awesome idea you just had? Or that freelance project you've committed to delivering with a tight deadline? Or even that side project you wanted to do but weren’t really sure how to kick off? With JHipster you will take no more than 20 minutes to create a simple microservice to validade your idea and solve your problems.Before, you probably had to worry about how your application would connect to the database, how to setup a database connection pool to handle many users, how to secure your application and manage the users, and how to deploy it either on an on-premise infrastructure or on a cloud environment. I can guarantee that these are just few elementary questions you will need to solve due to the inherent distributed nature of Microservice Architecture: scaling your Microservices, discovering and communicating to others, centralizing distributed logs, and monitoring all Microservices in a single dashboard.
I don't know about you, but when I worked on freelance projects, it used to take me quite a long time to progress from a greenfield application to effectively developing what really mattered: business logic. It made me wonder whether there were solutions out there that could do all the heavy-lifting for me, allowing me to skip all these time-consuming efforts and letting me put all my focus on developing my business. Well, I found an awesome tool that could do just that for me.Meet JHipster
JHipster is an open-source project that can handle all those previous concerns and many others. JHipster was originally concepted as bootstrap tool to generate monolithic applications using AngularJS as frontend (learn about the evolution of AgularJS) and Spring Boot as backend (if you are not a Sping Boot person learn about another option to build server-side applications with Java EE) , with its own custom interfaces in the middle of them to seamlessly integrate both technologies. The tool has a sweet pick-and-choose option to generate applications. For example, JHipster will ask you how you want to secure your new application, either using the classical HTTP Session Authentication or a token-based authentication with OAuth2 or JWT. You even have the option of using a social login with Twitter, Facebook, or Google authentication. JHipster is largely embraced by the community and its number of options offered has dramatically increased. Nowadays you can even develop your own module, which is a plugin you can integrate within any kind of framework and share on JHipster's marketplace
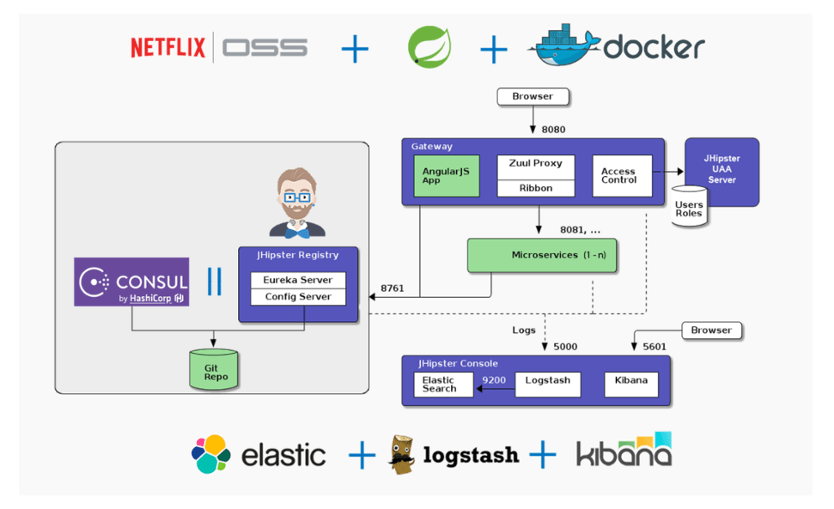
Besides monolithic applications, JHipster can generate modern applications based on Microservice Architecture. This architecture is mainly composed of three applications:
- 1) The JHipster Registry application which configures, monitors, and scales your Microservice. In short, this is a service registry application on top of Spring Cloud Netflix and Spring Config Server frameworks, which handles communication details among different Microservices such as service discovery, routing, load balancing, and scalability.
- 2) A Microservice application, which is a genuine cloud-native java application built on top of modern frameworks such as Spring Boot, Netflix OSS, Hibernate, Gradle/Maven, SQL/NoSQL, ELK stack and much more. It exposes its services either by traditional REST endpoints or through a data streaming approach such as Kafka.
- 3) A gateway application that handles communication traffic and integrates seamlessly with other Microservices. This gateway is an AngularJS application which routes the HTTP request to Microservices, applies security constraints (auth/auth, encryp), loads, balances, and health checks.
Take a look at the depicted architecture:
Learn more about refactoring monoliths to a Microservice architeture in our whitepaper "Microservices Architeture as a Large-Scale Refactoring Tool"
What Are We Going To Build?
As this blog post title suggests, I propose we build a Microservice in the short span of 20 minutes as well as browse through some of its functionalities. Assuming that your environment already has Java8, NodeJS, and Docker installed, you should be able to create your Microservice in about 20 minutes. To give a bit of a background story, let's assume we are professional traders and we need to build a Microservice that will manage our book of transactions. There should be a simple CRUD operation with some required fields. We'll build a Microservice to handle all backend activities and a gateway to handle our Microservice entrances. But here’s the thing: I won't show you detailed step-by-step instructions on how to use the tool. Instead, I will point you to JHipster's awesome documentation that is so extensive that you won't have trouble walking through it by yourself. So, are you ready? I am. Let's go!
Your Microservice In 20 Minutes
It's time to roll up our sleeves and to check out all the cool things JHipster can do for us. For this tutorial, make sure you have both Docker and Docker Compose installed. If you’re not familiar with Docker, check out this Docker post. Firstly, create a root directory for the project:
mkdir jhipster-microservice-example
cd jhipster-microservice-example
Start the JHipster Generator container to generate the applications:
docker container run --name jhipster_generator -v $(pwd):/home/jhipster/app -v ~/.m2:/home/jhipster/.m2 -p 8080:8080 -p 9000:9000 -p 3001:3001 -it --rm jhipster/jhipster bash
Our first generated application will be the Microservice. In order to do that, create a folder and run the JHipster generator command inside it:
mkdir orderbook
cd orderbook/
jhipster
Choose the following options for a Microservice:
Type of application: Microservice applicationApplication base name: orderbook
Port: 8081
Default java package name: com.vbk.orderbook
Use the JHipster Registry to configure, monitor, as well as scale your Microservices and gateways: Yes
Type of authentication: JWT authentication (stateless, with a token)
Type of database: SQL
Production database: PostgreSQL
Development database: H2 with in-memory persistence
Hibernate 2nd level cache: Yes, with HazelCast (distributed cache, for multiple nodes)
Building tool: Gradle
Other technologies: none
Internationalization support: No
Besides JUnit and Karma, other testing frameworks: Gatling
JHipster Marketplace: No
JHipster will generate a bunch of files, including .yo-rc.json, which contains all of JHipster's metadata for the generated application. Now, it's time to generate our first entity. Let's create the Position entity by running JHipster's entity generator command with the following options:
jhipster entity position
This is what you should see for the first field:
What is the name of your field? asset
What is the type of your field? String
Do you want to add validation rules to your field? Yes
Which validation rules do you want to add? Required
Repeat the steps for the other fields. In the end, you will get the following:
Field: asset (String) requiredField: buyAt (LocalDate)
Field: sellAt (LocalDate)
Field: entryValue (Double)
Field: exitValue (Double)
Field: operationType (OperationType) required
Enum: OperationType values (SHORT,LONG)
Data Transfer Object (DTO): Yes
Separate service class for your business logic: Yes, generate a separate service class
Add filtering: Dynamic filtering for the entities with JPA Static metamodel
Pagination on your entity: No
Note: You can safely override all conflicts caused by generated files.
The next step is to generate the gateway application, so that we can perform CRUD operations over the new entity. Go back to the project root directory and create a new folder for the gateway, enter it into the subfolder, and run the JHipster generator command again:
cd ../Type of application: Microservice gateway
mkdir gateway
cd gateway/
jhipster
Application base name: gateway
Port: 8080
Default Java package name: com.vbk.gateway
Use the JHipster Registry to configure, monitor, and scale your Microservices and gateways? Yes
Type of authentication: JWT authentication (stateless, with a token)
Type of database: SQL
Production database: PostgreSQL
Development database: H2 with in-memory persistence
Building tool: Gradle
Other technologies: No
Framework for the client? Angular 4
LibSass stylesheet preprocessor for your CSS? No
Internationalization support? No
Besides JUnit and Karma, other testing frameworks: Gatling
JHipster Marketplace? No
Create UI With JHipster Generator
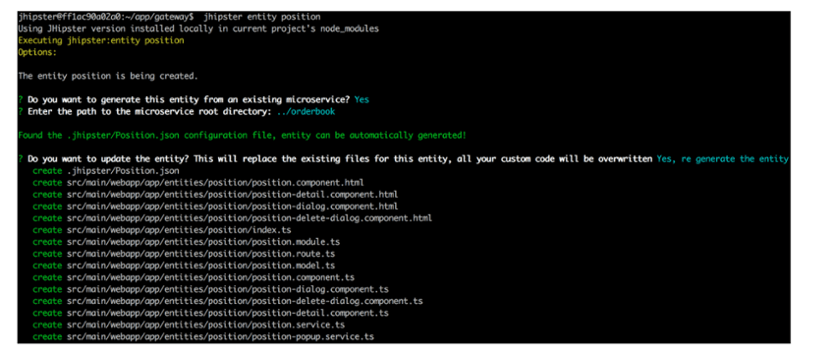
We have now generated the gateway application, but we still need to explicitly ask JHipster to create the UI of the CRUD functionalities for the Position entity we had previously created for the Microservice. Let's ask for JHipster to create it now: Run JHipster's command.
jhipster entity position
In order to generate the entity, select the option to generate an entity for an existent Microservice and point it towards the Microservice path. As you can see, JHipster will do all the heavy-lifting for us:
The last step we need to complete is to generate a docker compose file to handle all Microservices, gateways, and their dependent services. So, let’s take a step back to the root directory and create a docker folder before running the JHipster command:
cd ../
mkdir docker
cd docker/
jhipster docker-compose
JHipster will ask some questions and here's what we should answer:
Type of application: Microservice application
Root directory for gateway and Microservices: ../
Applications to include: gateway, orderbook
Monitoring: Prometheus
Admin password to secure JHipster Registry: admin
We are now done with the generation code. Let's exit the JHipster generator container and spin up all the services we've created. Go to each application, generate a docker image, and then go to docker folder to start the containers:
exit
cd orderbook/
./gradlew -Pprod bootRepackage buildDocker
cd ../gateway/
./gradlew -Pprod bootRepackage buildDocker
cd ../docker/
docker-compose up
Let's see if JHipster generated everything correctly for us. You should get all applications up and running in a few minutes. Check the logs to see if you see the following messages:
jhipster-registry_1     | Application 'jhipster-registry' is running! Access URLs:
jhipster-registry_1     | Local: http://localhost:8761

...

orderbook-app_1         | Application 'orderbook' is running! Access URLs:
orderbook-app_1         | Local: http://localhost:8081

...

gateway-app_1           | Application 'gateway' is running! Access URLs:
gateway-app_1           | Local: http://localhost:8080
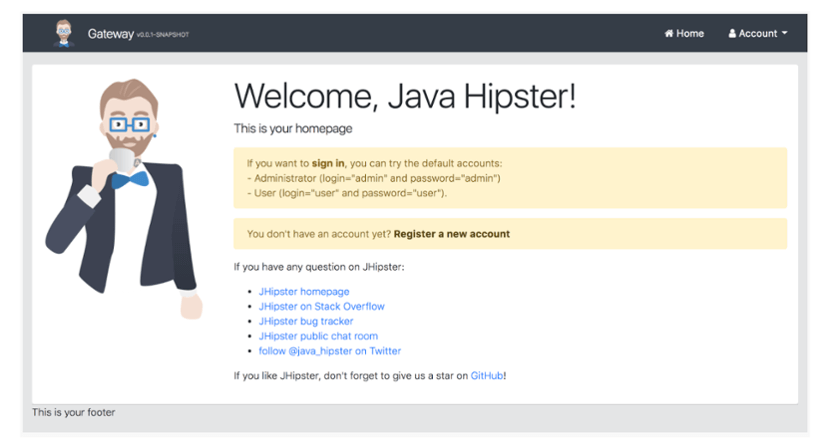
Accessing http:/localhost:8080, you can now see your gateway's welcome page:
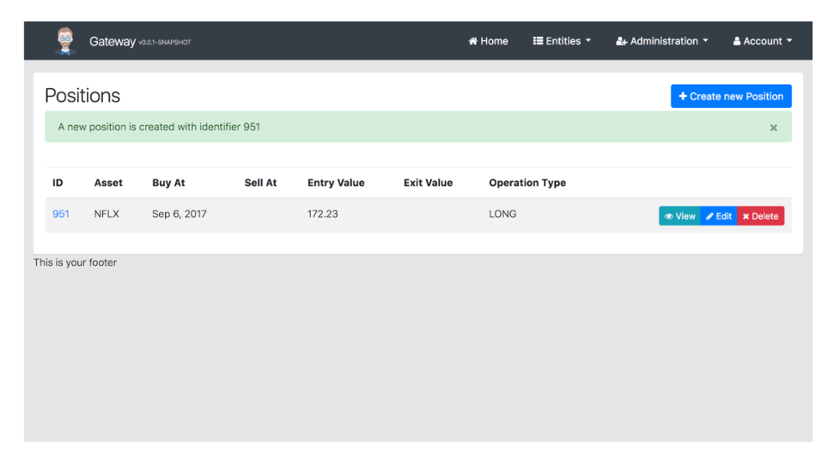
Use admin/admin to sign in and go to the Entities > Position Menu. Now, we are at the Position list page and we can create our very first entry by clicking on Create new Position. Fill in the fields and click on Save. You should see a page similar to this one:
Congratulations! Now not only do you have both the gateway and Microservice up and running, but also a full end-to-end CRUD for an entity. There are so many other cool things JHipster can do for us but I’ll save that for another post. Until then, I'd love to hear from you: Have you ever used JHipster before? Do you know of any other similar solutions? Has this tutorial worked for you? You can head over to my GitHub page and check this tutorial code. See you next time!
Author
Vinicius Kairala
Vinicius Kairala is a Senior Consultant at Avenue Code. He has spent the last 16 years working in technology companies with a focus on enterprise applications and is currently very interested in Complex Event Processing (CEP) on high available and scalable systems.


