Getting Started With Java EE
The project will consist of a simple project with JAX-RS and CDI.
To follow the example presented here you will need:
- Java 8 JDK (No particular reason for this choice - it's simply the newest one): Download
- Maven: Download
- Your favorite IDE: Eclipse, IntelliJ, Netbeans
- A JavaEE application server: Wildfly, Payara, Glassfish, Apache TomEE
Creating the Project
To create this project I will use Maven, and to keep the creation IDE agnostic, I'll use it from command line. If you don't feel comfortable doing the same, you can use your favorite IDE for the job.
Maven has several archetypes that can assist us with this task. The one that I'm going to use gives us just what we need to create a Java EE 7 project.
In a terminal, use the following Maven command to create the project:
mvn archetype:generate -Dfilter=com.airhacks:javaee7-essentials-archetypeThis command should give us something like this:

We choose number 1 and after this we choose number 3:

The difference between number 3 and 4 is that the latter is already configured with JAX-RS and with CDI. But don't worry: we will get there in a few more steps.
Afterward, we need to set the final properties for Maven to create the project. You can choose any values that you want. For my project, I used the following:

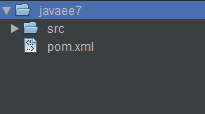
This will create our project and give us the following structure:

The content of the pom.xml file should be the following:
That's it! This is everything that we need to start our Java EE project.
Creating a Rest Endpoint Using JAX-RS
To create a rest endpoint, we first need to configure the entry point for all rest resources. To do this, we'll create a new class in our project, as seen below:
JAX-RS requires that you create a class that extends Application to identify that you are using it. The annotation @ApplicationPath("rest") identifies the path that will serve as the base to all our endpoints.
Next, let's create and expose our endpoint. We'll begin by creating a new class called HelloRest:
The @Path annotation dictates that this class will handle calls made to the URL /rest/hello, and the @GET dictates that the hello method is responsible for Http Get calls.
Time to test our rest endpoint!
If you are using an IDE, you will probably have to setup the application server that you downloaded into it. To keep it simple, we are going to use the terminal.
First, navigate to your project home folder (mine was \ac-blogpost\javaee7) and run:
mvn clean packageThis will generate the javaee7.war file of our application in the target folder. Since I'm using the Wildfly Application Server, I'll copy my war file to my <wildfly-home>\standalone\deployments folder and start Wildfly by running the standalone script. Depending on which OS you are using, you will either run .sh or .bat. The script will throw a lot of logs output about the server startup. The part we are interested in should look like this:

This basically tells us that it recognized our war file and is deploying it. It also shows that it's using the RestEasy implementation of JAX-RS (depending on which server you used to deploy our application, it may show a different implementation of JAX-RS).
Our application should now be listening to calls on this URL, http://localhost:8080/javaee7/rest/hello, and you should see the following response:
Hello Rest!
Need some help building backend systems? Let Avenue Code be your guid.
Configuring CDI
CDI (Context and Dependency Injection) is much more than just a simple DI framework for Java EE, and could be its own complete article. For now, since this is not the focus of our current post, I'll simply leave this link here with more information on the subject for those who are interested: Overview of CDI
For our project, we'll stick with the basics for demonstration purposes. So, to enable CDI in our project, we need to create a file under webapp/WEB-INF folder called beans.xml with this content:
That's all that we need to inject our classes using CDI. To demonstrate, I created another endpoint that simply returns the double of the number that we passed as parameter. The code follows below...
First I created a service class:
Nothing new here, just a simple class that doubles the value passed as parameter. Next, I created a new endpoint as follows:
In this class are three new things. First, in the method doubleOf, we used the @PathParam annotation to bind the {number} inside the @Path annotation with the number method param. Secondly, the @Inject annotation, which tells the CDI to - naturally - inject CalculatorService for us. Finally, the @Produces annotation, which simply entails returning a plain text as the response of our rest method.
Run mvn clean package again and copy the war file to the deployment folder of your Application Server. If the server is still up, it will deploy the application for you automatically. Otherwise, just start it over again. Now you should see the following output if you access http://localhost:8080/javaee7/rest/calculate/doubleOf/2 :
4
Adding Executable Jars
To finish this up, I'll show some alternatives to the Springboot executable jar that can be done with Java EE.
Wildfly-Swarm Application Server
Wildfly has a side project known as wildfly-swarm, the idea of which is to "provide just-enough-appserver to support whatever subset of traditional JavaEE APIs your application requires". For more information here is the project site
Doing this is pretty straightforward. We just need to add the plugin to our pom.xml as follows:
To execute this and generate our executable jar, use the command mvn clean package -P wildfly-swarm
This will create a file named javaee7-swarm.jar under your target folder. An interesting note about the build process: the plugin detects the dependencies that we are using in our projects, and adds them to the final jar. Here is the snippet of the Maven proccess that demonstrates this:

Now you can simply execute the jar file with: java -jar target\javaee7-swarm.jar
The endpoint is now changed from http://localhost:8080/javaee7/rest/calculate/doubleOf/2 to http://localhost:8080/rest/calculate/doubleOf/2.
Payara-Micro Application Server
The Payara server also has an alternative to run war files from command line - here is a good description.
To create an executable jar using Payara-micro, you can use the following command:
java -jar payara-micro-<version>.jar --deploy javaee7.war --outputUberJar javaee7-app.jar
This will create the javaee7-app.jar, and you can execute it with: java -jar javaee7-app.jar
The endpoint will still be the same as before: http://localhost:8080/javaee7/rest/calculate/doubleOf/2 and http://localhost:8080/javaee7/rest/hello
CONCLUSION
So as we can see, creating a Java EE application is quick and easy. In this example, we used just one dependency for the entire project in the pom.xml, which is possible because Java EE provides all the tools needed for the job. In my experience, this allows for increased focus on your business needs, improving overall productivity (talking about productivity, learn how to build a microservice in 20 minutes with Java) . For the unconvinced, don't forget that you can even have executable jars using Java EE! There are so many other useful features we could add - maybe these will be topics for future posts.
Thoughts? Do you already use Java EE in your projects? If not, would you give it a try? Let me know in the comments!
Author
Felipe Moraes
Felipe Moraes is a Java Software Engineer at AvenueCode. He is a Java EE Evangelist who is trying to show the world it's simplicity.


