
Infrastructure as Code (IaC) has become a popular term, especially in the DevOps area. It has already become a rule of good practice in companies that use the most diverse cloud providers available on the market.
IaC is a method that uses definition files (usually standardized configuration files, such as json and yaml) to manage and provision IT infrastructures. This practice can be understood as a software engineering approach applied to operations.
IaC brings many benefits, such as agility due to the automation capabilities in the provisioning of infrastructure. This allows the configuration of resources using only definition files. Another great benefit is consistency, due to the well-established steps coming from IaC. Gaps and discrepancies that would be created by a manual process are virtually eliminated. Security is also an important factor on this list, as IaC tools allow you to quickly find and fix errors and solve problems in an automated way. Therefore, the practice of Infra as Code follows the same principles as the DevOps culture in terms of speed and consistency in the delivery lifecycle.
Terraform Concepts
According to the official documentation from Hashicorp, the company that created Terraform, the tool can be defined as follows:
"Terraform is an infrastructure-as-code (IaC) tool that lets you safely and efficiently build and change versions of infrastructure. This includes low-level components such as compute instances, storage, and networking, as well as high-level components such as inputs, DNS, and SaaS features."
It is worth mentioning that there are other interesting IaC tools, such as AWS's CloudFormation and Google Cloud's Deployment Manager. However, Terraform offers several benefits and advantages, such as those listed below:
- Perform orchestration, not just configuration management.
- Supports multiple providers, such as AWS, Azure, Oracle, GCP, and many more.
- Provides immutable infrastructure, where configuration changes smoothly.
- Uses easy-to-understand language, HCL (HashiCorp Configuration Language).
The lifecycle of projects in Terraform can be illustrated with the following flowchart, which includes the name of each stage and its associated command:
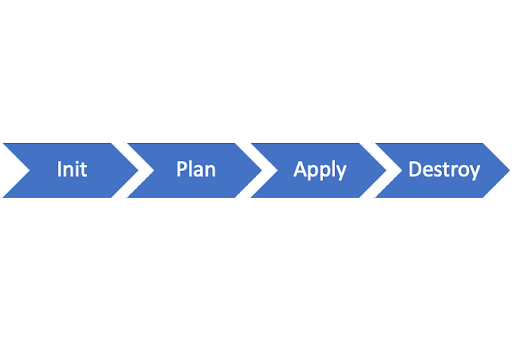
- terraform init: Initializes the Terraform (local) environment. It only needs to be run once per session.
- terraform plan: Compares the state of Terraform with the current state in the cloud, builds an execution plan, and displays it.
- terraform apply: Executes the plan.
- terraform destroy: Deletes all resources controlled by this specific Terraform environment.
In the context of Terraform, there are several important concepts for using the tool, and the main ones are listed below:
- Variables: Terraform uses input and output variables, following a key-value pattern. Input variables are used as parameters to customize deployments, while output variables are return values from a Terraform module that can be used by other configurations.
- Provider: Terraform users can provision their infrastructure on leading cloud providers such as AWS, Azure, and GCP, among others. A provider is a plugin that interacts with the various APIs needed to create, update, and delete resources. Terraform has several providers for different technologies, and each of them gives the Terraform user access to its resources.
- Module: Any set of Terraform configuration files in a folder can be considered a module. Every Terraform configuration has at least one module, known as its root module.
- State: Terraform records information about the infrastructure created in a Terraform state file. With the state file, Terraform can find and manage the resources it created earlier, and update them accordingly.
- Resources: Cloud providers offer various services, known as resources in Terraform. Resources can be anything from compute instances and virtual networks to higher-level components like DNS records. Each resource has its own attributes and parameters.
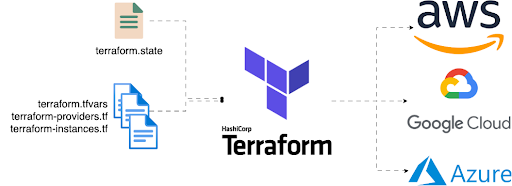
Terraform requires configuration files to function properly. These files, which use either the .tf or .tf.json file extension, describe infrastructure in Terraform. Unlike imperative programming languages, Terraform uses a declarative model to define infrastructure. Configuration files enable you to write a declaration of the desired state. A Terraform configuration consists of one or more files in a directory, such as provider binaries, plan files, and state files after Terraform runs the configuration.
The following are the four types of configuration files used in Terraform:
- Configuration file (*.tf files): This file declares the provider, resources to be deployed, the type of resource, and all specific settings for each one.
- Variable declaration file (variables.tf or variables.tf.json): This file declares the input variables needed to provision resources.
- Variable definition files (terraform.tfvars): This file assigns values to input variables.
- State file (terraform.tfstate): This file is generated after running Terraform and stores state information about the managed infrastructure.
 Hands-on with Terraform on Google Cloud
As explained earlier, one of the great advantages of Terraform is its ability to work across multiple cloud platforms. In this example, we will focus on using Terraform with Google Cloud Platform (GCP). The general flow of using Terraform is as follows:
- Set up an account with a cloud provider (AWS, GCP, Azure, etc.).
- Install Terraform locally.
- Add a provider - AWS, GCP, Azure, etc.
- Write configuration files.
- Initialize the Terraform provider.
- Run the
plancommand to view the infrastructure to be created. - Run the
applycommand to apply the changes. - Run the
destroycommand to delete the provisioned resources.
To keep this tutorial concise, we assume that the reader already has a GCP account. If not, you can follow the tutorial at this link.
It is also important to have the Google Cloud SDK installed on your local machine, as it is how we will interact with the Cloud. To install, follow the instructions in this link according to your operating system.
The next step is to install Terraform locally. The tool is compatible with Windows, Mac, and Linux platforms. For Mac users with the Homebrew package manager, simply run the following command to perform the installation:

To check if the installation was successful, use the command below to view the installed version:

To install Terraform on other platforms, you can follow the tutorial in the Terraform documentation through this link.
To continue with the tutorial, create a directory to store the Terraform code that we will develop. For example, you can create a directory called "terraform_101". In this directory, open a terminal session (command prompt on Windows) and run the following command to authenticate with your Google Cloud account:

To check which project and account settings are selected, simply run the following command:

If the Google Cloud project you want to work on is not the one being shown, you can define another project using the following command:

An alternative method for running Terraform code on Google Cloud is through service accounts. You can follow this tutorial for step-by-step instructions.
Our project goal is to create a Google Cloud Function using Terraform. Cloud Function is a serverless component of Google Cloud that executes code without creating servers.
To begin, create two folders inside the terraform_101 directory: src and terraform. In the src folder, create an empty file called requirements.txt and a file called main.py with the following Python code:
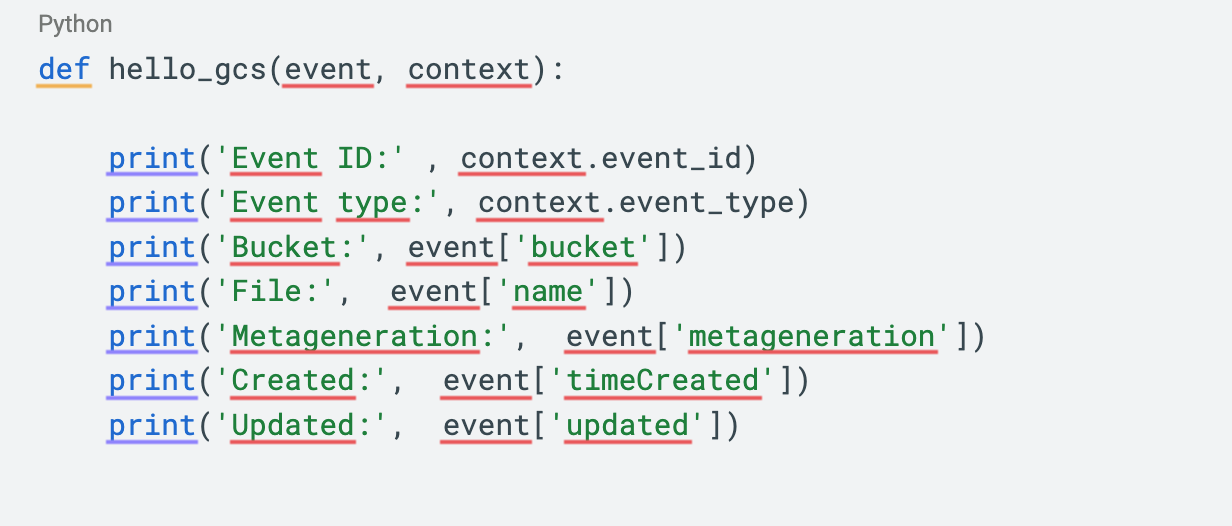
This is the code for our Cloud Function. It will run each time a bucket on Google Cloud Storage receives a new file. Before developing the Terraform code, let's create a bucket in Cloud Storage. We'll call it ac-test-terraform-state (this name must be globally unique). This bucket will store the Terraform state. Using a bucket for Terraform state storage is a good security practice. If the state is stored locally while developing, sensitive data from your Google Cloud account could be exposed when uploading the project artifacts to a version control system like GitHub.
To create the bucket, go to the Cloud Storage section in the Google Cloud console. Buckets can be created using only single-region storage, and all other settings can be left at their default value.
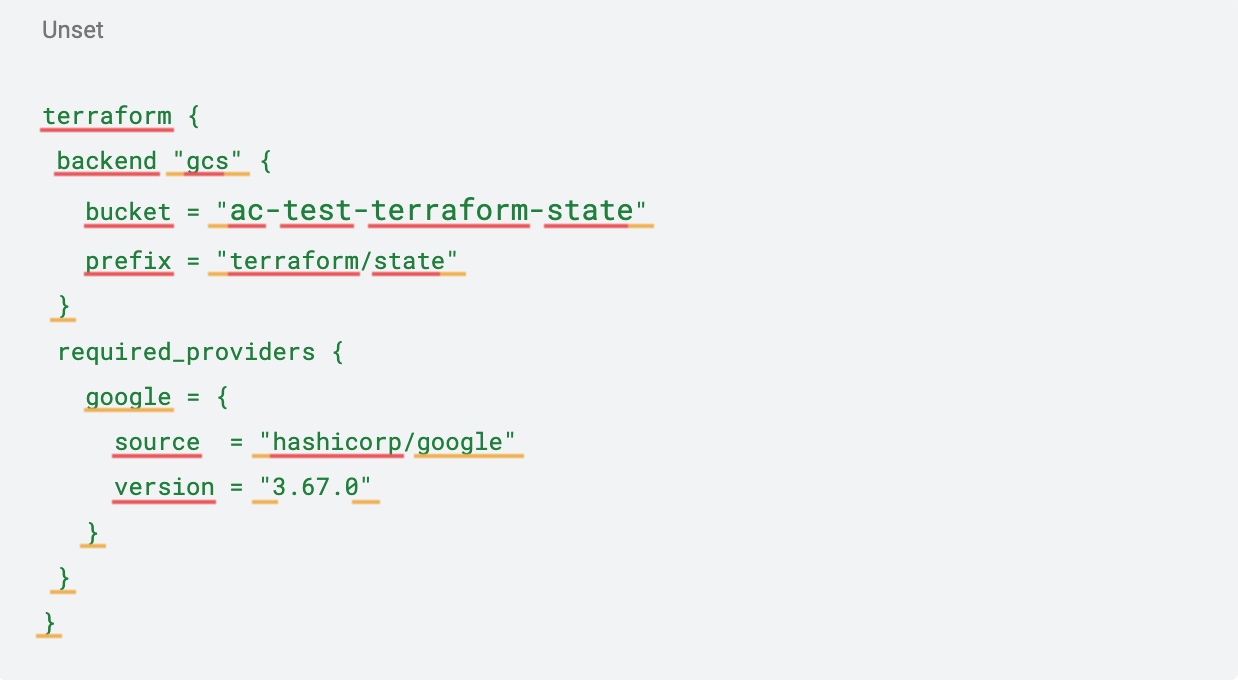
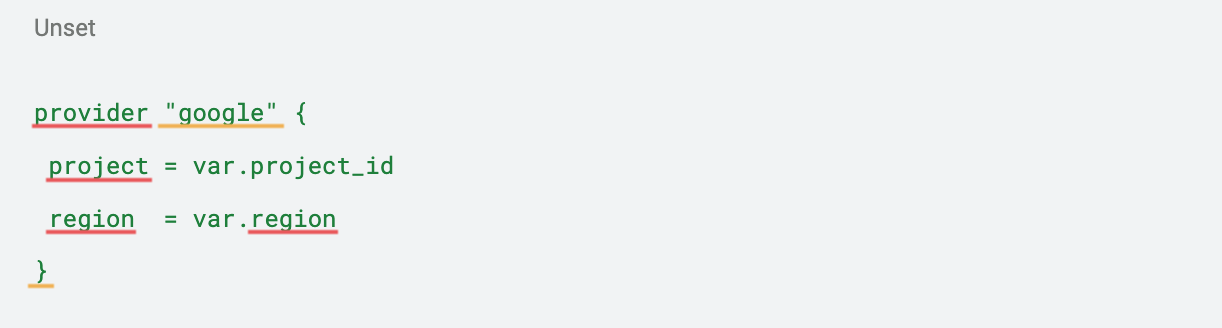
After creating the bucket, let's start developing the Terraform code. In the Terraform folder, create a file called backend.tf and populate it with the following code. This file will configure the Terraform environment with the Google Cloud provider and the direction for state storage:
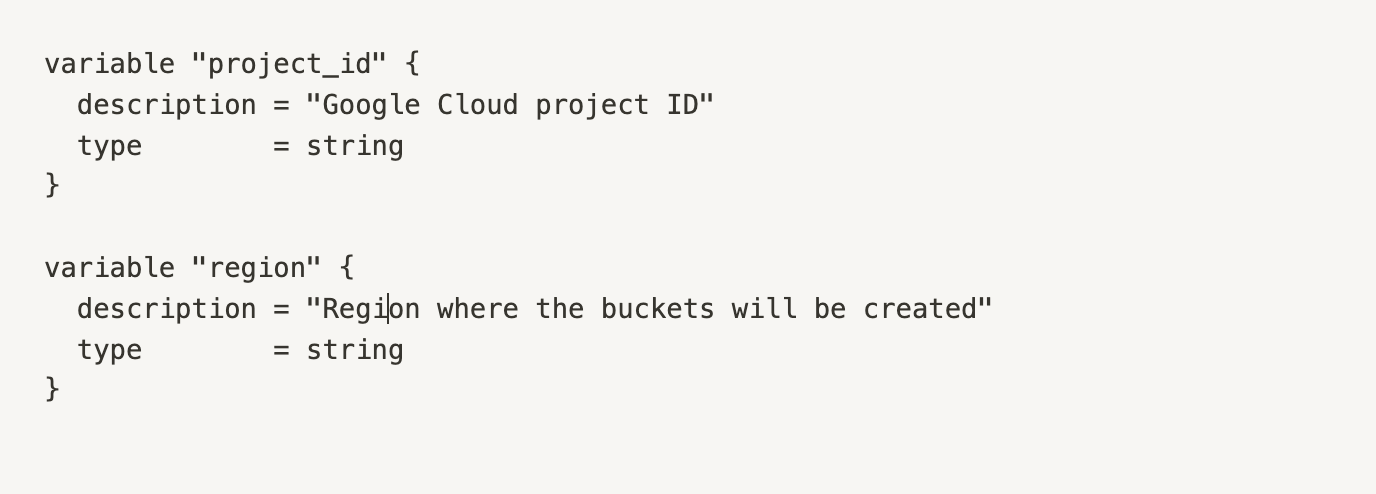
Next, create a file named variables.tf to store the variables that will be used throughout the code. Use the following code, but make sure to change the variables to match your Google Cloud project and the region you have chosen to create the buckets:
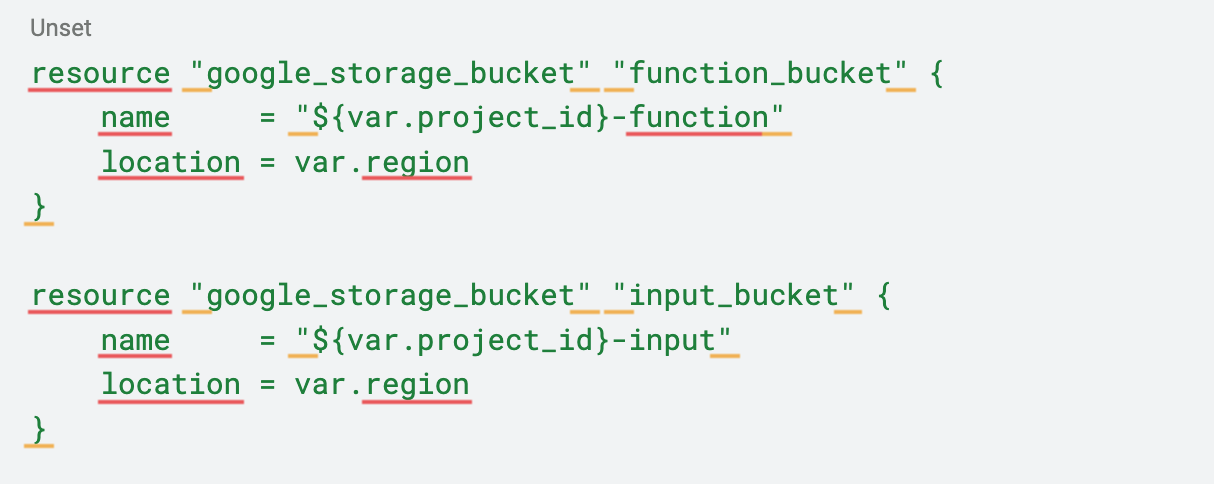
 To begin, create a storage.tf file with the following code. This declares the creation of two additional buckets in Cloud Storage: one for uploading files to be processed by the Cloud Function, and another for storing the function's code.
 Next, we will create the main.py file, which will establish a connection to the variables file.
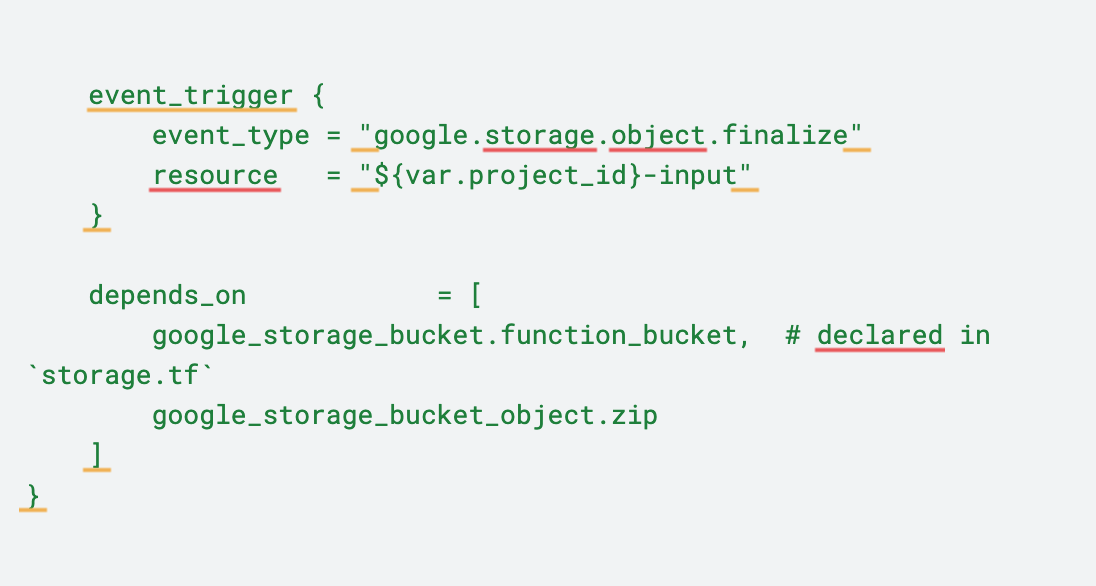
 Finally, we will create the function.tf file, which creates the Cloud Function. This file is divided into three parts. The first block locates the function's Python file in the src directory and transfers it to a zip file. The second block uploads the zip file to the previously created code storage bucket. The last block creates the function itself.
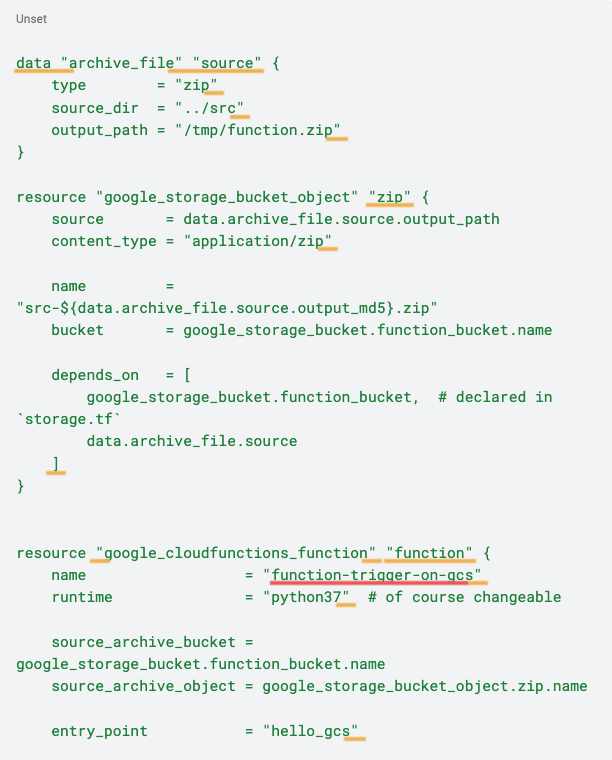
 With the Terraform code ready, we can now begin the deployment process in the cloud environment. To do so, navigate to the terraform_101/terraform directory in the terminal.

To initialize the Terraform environment, use the following command:

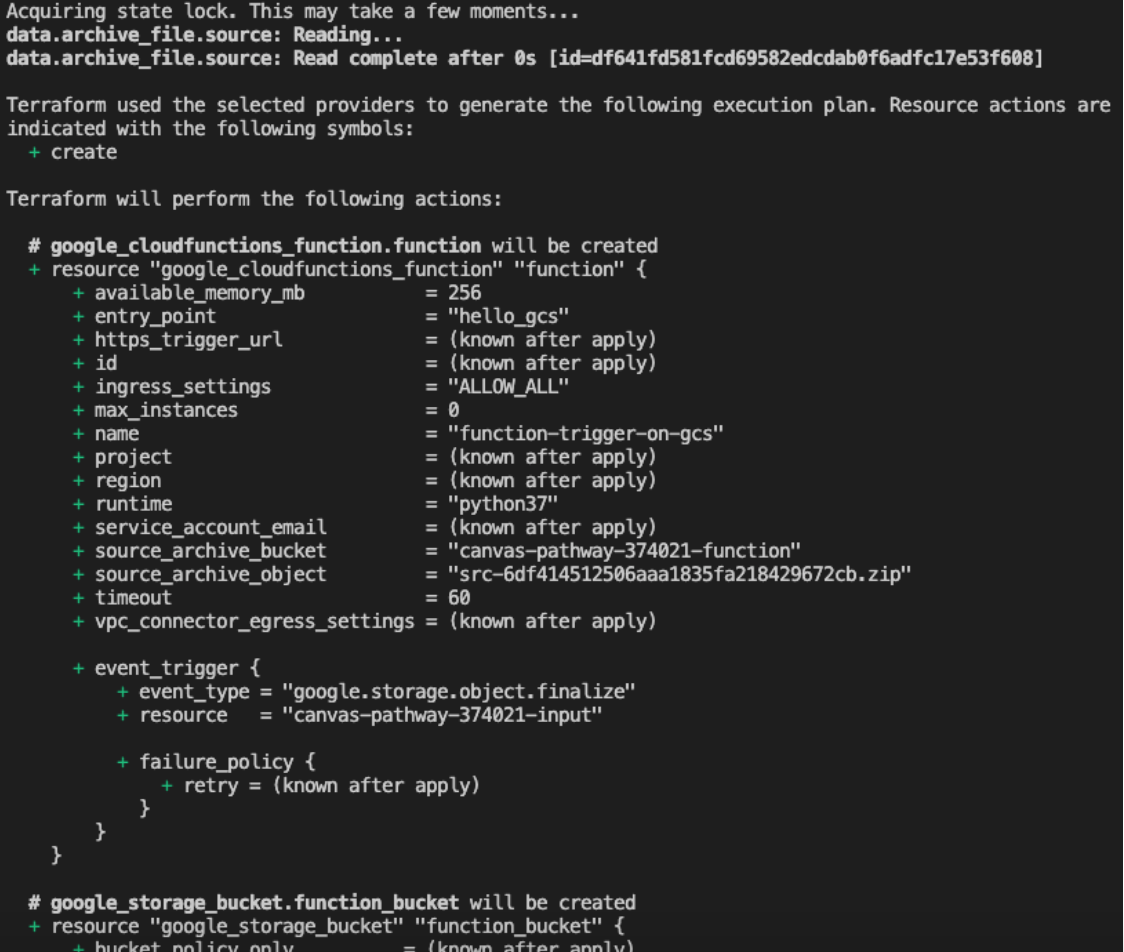
Next, we will check what will be created by our code. Use the following command. The result will be similar (though not necessarily identical) to the image below.

The next step is to deploy the Cloud Function using the following command. After executing it, you will be able to see the Cloud Function created in the Google Cloud console.
The next step is to deploy the Cloud Function using the following command. After executing it, you will be able to see the Cloud Function created in the Google Cloud console.

Once you have created the Cloud Function, you can upload any file to the input bucket (created in the code) and track the results in the Logs section of the created function.
To remove the function from your environment, use the command below, and Terraform will destroy all the artifacts it created:

Conclusion
The purpose of this article was to provide a brief introduction to the Terraform theme applied to the Google Cloud Platform environment. Many other improvements can be made to this project, such as the addition of a CI/CD pipeline to automate the process.


